Tuesday, December 25, 2012

My Vintage Joy Project

I got some Huge "JOY" wooden letters from Crafty Wood Cutouts last year.

I painted the letters and I used some vintage scrapbook paper images. I also used some of the 2-step crackly finish from Anitas. And some antique medium to make it look old.


It's hard to tell how big the letters are, but they are sitting on an old treadle sewing machine cabinet top if that gives some perspective.

Here is the HUGE image so you can see it better.


Here are a few other projects from Crafty Wood Cutouts that I painted.


I painted these all last year and had fun because they are easy and I wasn't trying to be all that creative, I just wanted to enjoy the Christmas season by getting some paint on myself.

Merry Christmas!!!

Saturday, December 22, 2012

Countdown till Christmas Blocks using the Authentique, Festive Paper Collection

Here's my Countdown 'till Christmas Wood blocks I made with my Favorite paper, the Authentique, Festive Collection!!! I have the 12 X 12 paper pad, and I just got the 6 X 6 as well. Sometimes it's hard to find, but it's my favorite Christmas paper for 2 years now!!!


I cut up a 4 X 4 cedar wood fence post for the blocks! The blocks smelled good like cedar before I painted them. Now they smell like varnish.


I love the paper!


I used vinyl numbers and lettering, cut with my old cricut. I hate that thing! The only thing I can make it cut is vinyl. Paper always seems to have some kind of problem. Either it shreds or it cuts right through the mat, OR the paper sticks to the mat. Really. I'm sure I'm not doing something correctly. I think it was the first cricut ever made back in the day. Anyways I finally got it to cut a few numbers for my blocks and they look nice. So I take it all back now about the cricut. =)


So I had fun making these (except for the vinyl numbers)!!!  The phrase Christmas worked out well without any trouble. And the "Days Until" are just letter stickers.


"And to all a good night", from me and Abominable.

Wednesday, December 19, 2012

Christmas decoration - Wooden Christmas Blocks, Digital meets Old School

I made some wooden Christmas Blocks using digital graphics from Little Dreamer Designs.

For a few years I have subscribed to their monthy download of digital images that are very professional and cute! This year I took some 3" wooden blocks I had and sanded them down with my electric sander that you can get for cheap at Harbor Freight. It's the sander with the triangle shape. Mine is battery powered. It's handy but a pain when it runs out of battery power during the middle of a project and you have to stop and recharge it. (I should have got the corded version as I probably don't need to sand out in the wilderness where there is no power.)

Then I painted the edges of the blocks green with acrylic paint. You don't have to paint the whole block as only the edges will show.


Then using microsoft word I used some of the Little Dreamer Designs digital background papers and sized them to 3" in word. The I took some of the digital elements and placed them on top of the digital papers creating my little 3" blocks. For 3 blocks I created 18 squares. The Little Dreamer Designs are so cute I had a hard time narrowing it down to only 18 images. Then I printed them out on an inkjet printer on injet cardstock.

For a few of the squares I used some scrapbook paper. You can use scrapbook paper for all the squares if you would like. I even stamped a few squares with rubber stamps.

So after I had all the squares cut out, I used my favorite Colleen's Collage Pauge to glue the squares onto the blocks. You have to work quickly, especially with ink-jet printed paper. If you take too long, or paint too many strokes the ink-jet ink will bleed all over and make a mess. I use ink-jet printed images on ink-jet coated paper for decoupage all of the time without any trouble. Coat 1 side of the block with the glue and quickly place 1 paper square down and rub it with a dry finger to get any bubbles out. Then quickly coat the whole top with college pauge to cover completely. Use a real (flat 1/2" or so) paintbrush for this, not a foam brush. After coating the top of the paper once do not touch it! The paper and ink will get soggy for awhile and if you touch it again, you might lift the ink image off the paper, or it will stick to your fingers lifting off the image and ruin the image! So only do a few squares at a time so you won't have to touch the squares you've already done. Let them dry. That's why it helps to work on 3 blocks if you are impatient. You can do a few sides of each block and them let them dry and come back to them later.


After the whole square has images and the collage pauge is dry, I like to coat the whole block with varnish. The varnish dries to a hard finish while the collage pauge always seems to stay tacky and the blocks will stick together.

My favorite varnish for this type of project is Americana or Decoart DuraClear gloss varnish. It's a Polyurethane gloss varnish that is usually found near the acrylic paint section in a craft store. It's a brush on varnish that washes off the brush with water. It's sold in small bottles as small as the standard acrylic paint bottle, or in my favorite 8 oz. size which is about 7" tall.

The varnish has to dry for a few days so the blocks won't be tacky when you stack them. Look at the vintage Santa image in the middle. It's my favorite.

Don't worry if you make a mistake or the picture comes off in places. You can fix it by putting a christmas sticker over the mistake. Or you can distress the block a little with some smudges of paint. I always make mistakes and I just incorporate them into the project. If you get a bubble you can sometimes slice it carefully with a sharp craft knife blade and paint more decoupage glue over it.

Sometimes the projects with mistakes have the most character and turn out unexpectedly well. I have even decoupaged entire pieces of furniture, and the insides of drawers before, and the process is the same, and is never perfect, but some of the best projects have been the result of a goof-up.

No worries! (See my mistake below was covered up by some brown ink shading dots around the edge.)


So thanks to Little Dreamer Designs for their cute images that inspired me to create a decoration so I can look at the cute designs during the Christmas Holiday Season!

The square below on the left is some scrap book paper, the rest are from Little Dreamer Designs. See another mistake below covered with some stickers. =)


The square below in the center is some scrapbook paper, the rest are from Little Dreamer Designs.


Fun project and you can stack them differently every day during the holidays!


Monday, December 10, 2012

Make a table out of scrabook paper!!!

I always get frustrated when I purchase a new favorite scrapbook paper design because I don't want to hide it away in a scrapbook somewhere. I want to look at it. Some of the designs are suitable for framing, or in my case for making furniture out of...

So I started making tables with my favorite sheet of scrapbook paper on top!  
That way I can always look at it.

For this table I took a piece of pressboard 13" square. I decoupaged a red sheet of paper on top, and a favorite sheet of scrapbook paper on top. I bought some table legs at home depot, the kind that come with brackets that you can screw into the bottom of the table top. Then you can screw the legs into the brackets. I then got some trim for the table and had it mitre cut and used a nail gun to nail the trim to the table top. Then I stained the whole table and then varnished it. I like the oil-based varnish for tables. I used glossy. Then I could not leave it alone, so I put glue and mica glitter around the table as well. Viola. I can look at the scrapbook paper all of the time, PLUS I can put even more gobby Christmas decorations on it! Excellent!

Here are some more tables with scrapbook paper on top.

For this table I used some shelving laminate with the fake woodgrain already done. I just decopauged the sheet of scrapbook paper right over the laminate. I love the legs on this table! They are the same type of pre-done table leg with the screw in brackets. If you want it to cost less to make, you can cut your own table legs out of wood and screw them into the table top. Then you can glue another piece of wood on top of that for your table top. Somehow I found a few sets of square embellishments from the scrapbook store and stuck each one around the table. Then the varnish kind of stuck them down permanently.  I love this little table!!!


I used music tissue paper on this table. I stuck it down with decopauge glue which made it wrinkle for a different effect...we'll say it was on purpose...then I stained it a little to make it look old. It was originally the white music print tissue paper. Then after I varnished the table it looked a little vintage.


This blog post made me remember that I have several other tables I wanted to make, so I'll be gathering my supplies for when it's warm. It's hard to make the tables in the garage when it's cold outside as the varnish never dries. It freezes. So wait until spring but don't forget to save your cute Christmas scrapbook paper for a new table top. I'm going to make a halloween table this year!!!

Sunday, December 9, 2012

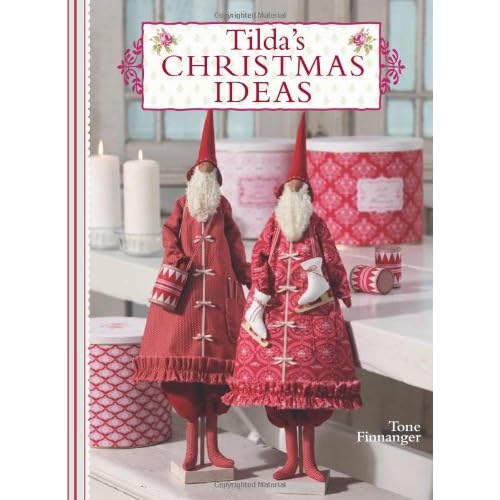
My Santa Elf Doll from "Tildas Christmas Ideas" by Tone Finnager.

I made this Santa Doll last year from a pattern in the book Tilda's Christmas Ideas by Tone Finnager. The doll is pretty tall, about 18 inches tall, but it's arms and legs are very skinny. I finally finished it this year!
My Crazy Santa Doll from "Tilda Christmas Ideas" by Tone Finnager.


First I had to sew the doll body and stuff it. Then you make the clothes and finally you embellish the Santa to give it some personality. My Santa does not look all tidy and organized like the book. Mine looks like a slightly wild elf that went a little crazy with the Christmas colors. 

I had fun making Mr. Santa Elf, but I didn't finish him for 1 year. He just sat next to my desk without his pocket sewn and no buttons, with his disheveled beard. So this year I finally gave him some buttons that look like suckers and some bows and some bells on his toes, and one on his hat. I left his beard the way it was and called him done!!!

I can identify with my Santa Elf. This Christmas I was a little disheveled, a little haphazard with my holiday outfits, with a bewildered stiff-in-the-arms look on my face, but ready to take on the holidays none the less.

Merry Christmas, from me and my Beardy Santa Elf!


Tuesday, December 4, 2012

Vintage Chandelier Makeover

Here is my chandelier makeover project.


I found an old brown 70's wood chandelier. It cost $3.00. I forgot to take a before photo of it. It had the plastic candles with the candelabra bulbs and lots of frayed wire. I took it apart to get the old dangerous wiring and plastic candles and lightbulbs out. There aren't any electronics in it anymore as they were all broken and the wires were all frayed. I painted all the wood white. (Had to clean out all the spiderwebs first.) The light area was just the right size for my 4 battery candles. Yay.

It was missing the bottom finial, so I bought a replacement finial at Lowes. I also found some washers in the light figure parts area to cap off the electronic area to make a solid base for the battery candles.

Then I put it all back together and it's adorable.


I was going to use it outside as a light fixture to hang down from a backyard canopy for a picnic, but now it's cold outside so I decided to just hang it up for fun, then I can take it outside whenever.

 Here's what it looks like when the battery candles are turned on. It's not very convenient to climb up there and turn them on, but sometimes you have to sacrifice convenience for "the artistic vision". Now all I need are those battery candles with a remote control.


Here is a movie I didn't even know I was taking while I snapped the photos. It shows the candles flickering.

Cute and easy project if you like giving old stuff a makeover. The hardest part is figuring out how to put it all back together again.

Monday, December 3, 2012

70's end table turns British Invasion!!!

My British Invasion End Table Project

I found a brown 70's end table for $5.00. (Again forgot to take the before photo.) Picture brown, brown, brown, with the rustic darker dents...kind of appropriate for that gold and avocado green era. I'm sure there are some microscopic shag carpet fibers underneath.


Some people see ugly brown beat up end table with jam splotches on it. I see British Invasion! The door on the front reminded me of a British phone booth for some reason. So I painted the whole thing colonial blue. Then I taped off the British flag and painted each color. I just freehanded it with the tape. Yeah baby, that's what I'm talking about!!!

I used this great green painters tape that is awesome. It prevents the paint from bleeding through. I just used acrylic paint for the flag as I will eventually varnish over it to protect it.

I bought a big clock knob for the door, as it reminded me of big ben.

Next I will add some kind of British symbol on the shelf. Haven't decided yet. There is glass that goes on the top but I put it somewhere to protect it while I'm working on it. (Can't remember where I put it now...it's really safe now as I'll probably never find it.)

So that's it so far...still a work in progress.


Here are the before photos.


Related Posts Plugin for WordPress, Blogger...