Sunday, December 28, 2014

My completed Tim Holtz holiday Merriment canvas project!

http://timholtz.com/holiday-merriment/
When I saw the above Tim Holtz Holiday Merriment canvas mini-class on the Tim Holtz blog I knew I wanted to create the project even though Christmas was a few days ago. After Christmas and all the rushing around at Christmas I looked forward to making a project without having to think up anything. I didn't have some of the supplies so I had fun improvising!

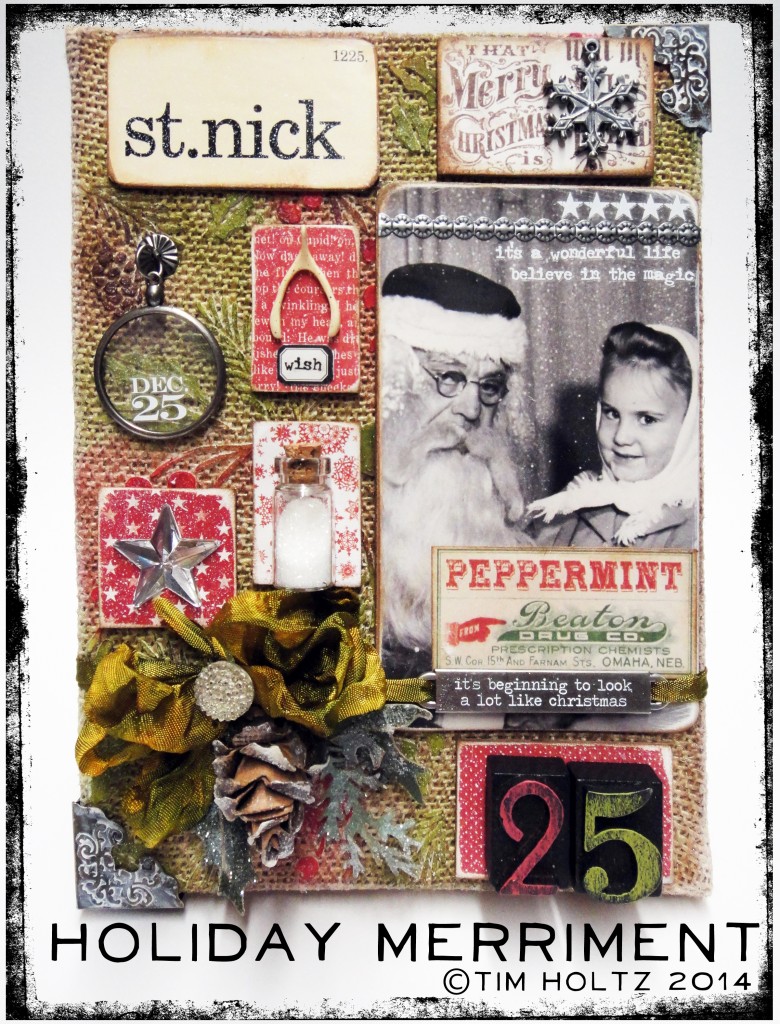
Here is my finished project!!!

I didn't have the found relatives occasions, holiday flashcards, or holiday ephemera and it's hard to find those items anywhere after Christmas as they seem to be all out of stock at this point so I found my own substitutions. I had most of the other items so I was able to create the project using the instructions from the Tim Holtz mini-class on his blog!!!

I found my own vintage girl with santa "christmas relative" on the web here. I found the candy canes wrapper ephemera here at littlemisscelebration.com. I didn't have a Tim Holtz monocle so I used a Tim Holtz fragment (clear plastic tag) and stamped on it because I didn't have the Christmas remnant rubs. The stamp didn't work so well, so I fixed it up carefully with a sharpie.I sprayed the back of my "fake monocle" with icicle spray for windows to make it frosted with ice crystals on the back, then I painted around the edge with silver paint for model cars. I glittered around the "christmas relative" and the fake monocle. I wish I had a Tim Holtz holiday word band, but I didn't so I used a different word band. I added some bottlecaps I made using vintage images.

For the rest I followed the instructions on the Tim Holtz blog using the same supplies as Tim.

I love, love, love this project!

Thanks Tim for the free mini-class! I am happy that I was able to complete my mini-class project in the comfort of my own craft room and it was tons of fun to make!

Tuesday, December 23, 2014

My frozen version of the Tim Holtz Merriment Clock Project!

https://www.etsy.com/transaction/248367834
I really wanted to make the Tim Holtz Holiday Merriment Assemblage clock that he made available on etsy, but the kits were sold out, so I was glad Tim made the instructions available to purchase.

I purchased the instructions and provided my own supplies and made this "Frozen" version!


It's hard to photograph with all the sparkle and the glare from the glass, but I'm so happy with how it turned out. The instructions were easy to follow!
Here's how I decorated the outside of the clock.
I coated the clock with the spray for windows that turns them temporarily to crystal. Then I wiped it off the glass with alcohol, but it gave a nice effect to the clock "bells". Then I covered the outside of the clock with decoupage glue and crystal glitter. Kind of a messy trial and error process. For the inside of the clock I followed Tim's instructions. The only thing different I added was a little porcelain penguin figurine. So cute!

I added a really big silk flower and a bow at the top!

I am very happy I got to try the Tim Holtz clock project from his etsy shop instructions! I feel like I went to one of his classes!

Here are some more photos.


Looks like a blinding snowstorm is going on inside the clock!

Brrrr, looks cold in there! Love the little dangle of charms on the side!

Merry Christmas and a Happy New Year!!!

I'm enjoying my frozen wonderland now, but soon I'm heading off to Disneyland where it's warm! Yahoo!

Sunday, December 21, 2014

December 12-Tags, Wintery Prancing Deer


http://timholtz.com/12-tags-of-2014-december/
I'm playing along with the Tim Holtz 12 Tags of 2014 shown above. I love Tim's December tag so I kept it about the same so I could practice the techniques. This was a fun one!

I  purchased the prancing deer die and was excited to try it out! I had fun with the background speckled snow technique but you can't see it in the photo. I didn't have any of the new frosted embossing plastic so I improvised with a piece of plastic packaging covered with Tim Holtz frosted film. Then I embossed that with the snowfall embossing folder and it kind of worked!

I also didn't have any of the word dies, but I do have the individual letter dies called thinlits - alphanumeric so I spelled out the word wishes and die cut it. Then I used ranger texture paste and the Tim Holtz Christmas stencil to create the jingle word over the top of the plastic. Then I covered the paste with glitter. I was in a Christmas glittery mood today, so I really went crazy with the glitter! I love the glitter.

So you can't tell how sparkly this tag is in the photo, but it really sparkles!


I didn't have the new Holiday Greens die, so I used the Festive Greenery strip die instead. I also wanted to try out some fake snow goop I just purchased so I decided to insert the greenery into the snow, and then douse that with glitter! I had a green bell but it was too bright so I toned it down with white alcohol ink mixative, and sprinkled that with glitter!


So I was just living it up with the frosted, snowy and glittery theme. I like how confident the prancing deer looks even though in my tag he looks slightly frozen due to all the ice (glitter) on his coat. =)
The prancing deer is now one of my favorite new dies!

I enjoyed making this tag and am very happy to have completed all 12 tags of 2014! I look forward to many more creative projects next year!

Merry Christmas!!!


Wednesday, December 17, 2014

Compendium of Curiosities iii, Challenge 17 - A Merry Mouse with Woodlands and Tinsel Twine

I have been having a blast participating in the Compendium of Curiosities iii Challenge on the Studio L3 blog by Linda Ledbetter. For Challenge 17 we are using the Tim Holtz Woodlands and Tim Holtz Tinsel Twine technique as found on page 60 of Compendium of Curiosities 3 by Tim Holtz. You can choose your trees from either the Woodlands Tree Lot, or Smaller Woodlands package.You can use Tinsel Twine in your project instead. I used both!
Challenge 17 is sponsored by Inspiration Emporium who will provide a $50 shopping spree for the winner of the challenge, with more prizes courtesy of Tim Holtz and Mario Rossi for the fabulous Curiosity Crew's choice winner!

A Very Merry Mousey Christmas


I decided to make a little woodlands Christmas scene for my project. How cute is this mouse?!!! I found the pattern in Barbara's etsy shop bvoe668! So adorable and it wasn't hard to crochet. I dressed up the mouse with some Tim Holtz trimmings! 
The pattern has the mouse resting in a crocheted walnut shell! So cute, I can't stand it!


https://www.etsy.com/listing/76772276/pdf-crochet-pattern-tiny-mouse-in-walnut?ref=sr_gallery_1&ga_search_query=crochet+mouse+pattern+walnut&ga_search_type=all&ga_view_type=gallery


Woodlands Tree's are addicting!
I'd never tried the woodlands tree technique before and it was pretty easy and fun. I had a purchased spool and decorated the spool and the tree. I used the tinsel twine technique at the bottom. I've seen the Tim Holtz display of all the Woodland trees in every distress ink color. Now I know why, you just can't stop at one color!


Mousletoe gives you a present!
My daughter named the mouse Mousletoe! I made the second smaller spool to look like the purchased spool. I got a regular wooden spool and added two wooden wheels and painted them like the purchased spool. I wrapped it with twine from the hardware store. The mouse scarf is some Tim Holtz Merriment trimmings ribbon. I made the hat using the trimmings, I folded a length in half, sewing the edges of 2 layers together to form a little hat. I tied the top with thread and added a bell. It was so tiny it was a little hard to manage, but adorable! The present is a little epoxy sticker with 2 foam dots on the back so it sticks out from the mouse tummy. I toned down the white of the mouse with a little watered down pumice stone distress ink. It's hard to tell in the photo, but the mouse looks more vintage since the mouse took his pumice stone "bath".


Candy Cane Woodlands are Yummy!
I wanted to try a different colored tree and it looks yummy like a candy cane! I put the tree on a wooden wheel and wrapped the tree base with twine to match the others!

So this project will make a fun addition to a Christmas Village. I wanted to keep the pieces separate so I can use them in different scenes, or all together. I had so much fun making these, I think I will make some more!!!

I've already started on another mouse in progress!

Merry Christmas!!!


Related Posts Plugin for WordPress, Blogger...