I made some plaster cast objects to use as embellishments for some Christmas projects. I tried out some DecoArt products and Andy Skinner techniques to make them look old. I also used some Modern Masters patina products that I like to use on little embellishments. I wanted some vintage treasure!
The plaster casts are inexpensive and are a fun way to try out various painting techniques on a 3-D surface. I've had these inexpensive plastic molds for a long time. They can be used to mold chocolate, but I use them with plaster.
I love
Modern Masters patina products. I hadn't tried them on plaster objects before. I have tried it out on
little plastic toys and the results were awesome!
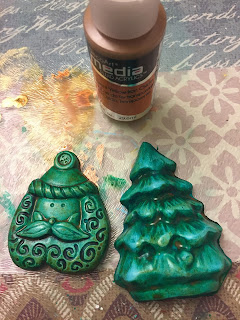
I painted a few of the objects with a base coat of the Modern Masters copper paint and let it dry. Then I painted a second coat, and while it was still wet, I sponged on some of the green and blue patina solution. The paint must be wet or the reaction won't take place. It will start to react right away but will take some time before the reaction is complete. You can see a spot where the copper paint was dry so the reaction wasn't happening. I had to put on more wet copper paint and drip the solution on again.
Here they are after the reaction solution has completely worked it's patina magic. It turns out differently every time, just like natural patina.
Who would ever guess this isn't real metal. Looks like something very old from an old world Christmas celebration long ago.
I noticed the other day in Hobby Lobby, they are selling a small Modern Masters "kit" with the copper paint and 2 patina solutions for $19.95. I have larger bottles I ordered online, but the kits would have been perfect!
Here's the whole bunch all together. They look great! Ignore the rusty Santa in the corner for now. I will show you how I created him later in this post.
So now that I experimented with the patina effect on my plaster embellishments, I decided to use Decoart products to make some more objects look old.
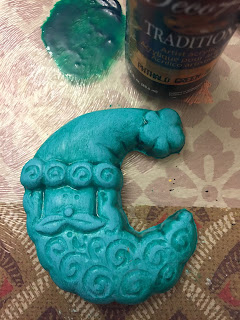
I decided to seal my plaster santa with some Americana gloss enamel before I started the aging process. I thought I could make this color look like a patina eventually. It looks like plastic now, but it will look better soon.
I love the Deco Art Media line of paints. They have so much pigment and are awesome to work with. My favorite! I watered down some Phthalo Green Blue and brushed it over the top and wiped some of it off.
After that dried, I covered the whole thing with Deco Art Media Antiquing Cream, English Red Oxide that I just got and was excited to try out. I let it air dry completely. After it was dry I wiped some of it away with a damp paper towel. I only used a tiny amount of water because I didn't want to remove too much. The Deco Art Antiquing Creams are another favorite! Thanks Andy Skinner for all the demo's in how to use it! Check out his tutorials on youtube or the Deco Art website.
Starting to look cool, but a little too colorful to be old. I added a little watered down yellow iron oxide and let it dry. I made the
Andy Skinner "dirty wash" with Ultra-matte Varnish, paynes grey, and quin-gold. It toned down and unified the colors, and made it look a little rusty. Look up
Andy Skinner and his tutorials on using
Deco-Art media products! They are so fun!
Then I dry-brushed on a very tiny amount of gold metallic paint to make it look more like metal. Mr. Santa is looking good! I love how all the layers make Santa look interesting and old.
I was happy with Mr. Santa so I decided to try the same type of technique on 2 other objects.
I decided to add a little clear glitter to the Christmas Tree to see what would happen.
I decided there was too much rust on this santa, so I dry brushed on metallic gold instead so it matches the other Santa.
This is kind of fun because there is no wrong answer. You can just paint over the top and change your mind. No pressure! Just playing with mediums and techniques!
So for my skinny santa, I decided to try some color as I wanted these to look more like wood.
So I just painted with cream, a metallic red, and a yellow, and mixed the cream with a little of the red for the face. The acrylic paint seals the plaster so the next steps won't sink in to the plaster. I like painting plaster as it doesn't have to be perfect, we're talking grade-school fun.
After the paint was dry, I covered the entire object with some fragile crackle medium. I just used some that I had, but any type of fine crackle medium will work. I let the crackle medium air dry for a long time, the jar says 12 hours, I think I let it dry overnight. Then I used the Media Antiquing Cream again, English Red Oxide, again, letting it dry completely before wiping most of it off. I LOVE how it seeps into the crackle and makes Santa look like carved wood with old varnish! I love crackle.
I couldn't see Santa eyes, so I used a little watered down paynes gray to dot his eyes, and shade under his nose and mouth. Don't water the paint down too much, more like the consistency of ink. I use my fingers a lot to dab off the paint if I get too much.
Trust me on this next Santa. He looks pretty bad right now with my grade-school paint job. It's ok, I promise, although I wasn't so sure at the time. But since I'm just playing with cheap-o plaster objects it doesn't matter, just having fun!
Time for the crackle medium. I had to let it dry a long time. Patience....
Whoa, look at him now! I forgot to take photos of all the steps on my colorful Santa, but after the crackle, I used the Antiquing Cream again the same as before. Then used the "Andy Skinner" dirty wash to tone down the colors to make them look old. I wiped it off in places so there was more color in some places. I used a little watered down paynes gray to shade around various areas, I always end up tapping the shading with my fingers so it's not so harsh. Then I dry brushed some metallic gold on the ribbon, and hat, and the fluff on the gloves. Then the wreath looked boring, so I added some red, green, and yellow dots. When it was all dry, I used some Tim Holtz glossy accents on the wreath and sprinkled on some clear glitter, just on the wreath.
So my santa went from grade-school craft project to respectable vintage santa. I thought he was a goner, but is now looking all vintage and cool! The antiquing medium hides the "can't color in the lines" areas.
I couldn't leave my patina objects alone while I was waiting fo another object to dry, so I dry brushed on some metallic gold. I just used my finger with paint, then I wipe most of it onto the counter, then lightly buff it over my objects where I want it. You could dry brush with a paint brush but then you would have to get up and wash brushes, and all that. It works.
I think this little star santa is my favorite of the bunch. I'm going to use him on a project. He looks very metal like he was a little copper santa up on a roof for years!
I added a little metallic dry-brushing to the leaves. I crackled a few of them to see what happened.
So here's my whole group of faux metallic, patina's, wood cut, rusty objects made from cheap plaster molds using Modern Master paint effects, and Deco Art media acrylics, and some random crackle medium.
I enjoy trying out techniques and mediums with these little dimensional objects just for fun. I've had the santa mold since probably the 1980's. The trees and leaves I got more recently so they might be available online somewhere. I get molds at the craft store where they sell chocolate molds, or online from amazon or ebay. They are usually around $3.00 or so. Plaster is cheap too.
So I hope you have enjoyed my play time, even though it was a long post, I think it's helpful to see the steps to realize that it just takes a lot of little tiny steps to produce these fun results and if you goof up, you can pour some more and try again. It's pretty fun.
What hasn't been fun, is I've been stuck all weekend with a broken heater in my house, so I've had no heat for a week now! It's been 55 degrees inside the house for a week. Sometimes it's warmer outside than inside the house. I put a space heater near the kitchen table and have been having some fun painting in my coat.
The part to repair the heater has been ordered but won't be in until tomorrow, with the delay over the Thanksgiving Holiday. I hope the part comes tomorrow. Don't know how much more of this freezing I can take.
Anyway, I have enjoyed being distracted by my little paint project in the cold!
I will use all of my items on some fun Christmas projects but haven't decided what they will be yet. I don't plan out too much in advance but just like to see what happens. I hope to post my projects as they happen!
I use the same techniques on steampunk projects so this is good practice for trying things out!


These are great. I have some molds similar to these which I bought in the early 80's. I've been thinking about getting them out to play with the plaster casts. It's been a few years since I've done that. Great suggestions that I know I'll try when I get a little time to play. THANKS!
ReplyDeleteIt will be fun!
DeleteThese are fabulous...pinned! I LOVE the crackle and the moon shaped Santa...a lot of work and so gorgeous!
ReplyDelete