Wednesday, August 1, 2012

Flea-market table Makeover for Baby's Room Project

Here is the table project for the new grand-baby! It was a thrift store table that started off kind of an orange-oak color and was pretty beat up. I stripped the top of the table and then painted the rest.

The baby's room is bright and colorful. I used Behr bright colored paint (the good stuff with the primer in it) and a glossy varnish.The top of the table was pretty after I stripped off the old orange color, so I left it natural.


All ready for baby!

Sunday, July 29, 2012

Designer Bibs for Baby Tessie


I made these designer bibs for the grandbaby girl due this August!!! I got a little carried away with my old scraps of fabric and made 17 bibs! I got the pattern from a shop on etsy called GrammysBabies. 

I like the pattern as you can piece it together so you can use smaller pieces of fabric you may already have. The bibs have a velcro closure. I purchased some babyville velcro in bright colors that I was able to find at JoAnns. It comes on large rolls. It will last forever as the bibs don't use very much.

I made some out of flannel and some out of cotton. It's a fun pattern to have around as you can make a few to have available for baby shower gifts.


Here they are all wrapped up ready for the baby shower! What says it better than I love Grandma on your bib!!!

Wednesday, July 4, 2012

The Country Band Scrapbook Wall Art

I never really understood country music until my son was in a Country Band one summer that played at all the local city festivals around my state. So we went "on tour" with them for many Saturdays during the summer. It was tons of fun. We made it a point to sample at least 1 strange food item from a vendor booth at each festival.

I learned to appreciate country music and found the tunes to be very catchy!

I made this "tribute" to the summer fun we had "on tour" with the country band! It's a scrapbook on wood with a clear coating of Epoxy Resin - Envirotex lite.

My son is a guitarist. Here's a link to the new band they are currently in, Artie Hemphill and the Iron Horse Band.
Here's link to Drew Williams Music who was the keyboard / singer.

 This was an interesting project. I used a "tile board". It's a board with some raised square areas so when you glue photos on, they look like raised tile. Here's a link to someone that sells them on etsy. I got mine a a local craft store that used to carry them. Once I had all the photos I decoupaged them onto the wood, making sure to also cover the fronts of all the images with decoupage glue as well. Then I glued embellishments all over the board. Make sure to seal all paper with decoupage glue for the next step.

After everything was thoroughly dry...it takes a few days to dry completely, then I put the whole thing up on some wooded blocks to raise it from a table surface. On the table surface a put a cookie sheet I didn't care about covered in lots of tin foil and paper to catch the mess.

That's because you next pour epoxy resin over the whole thing. It will dribble over the sides and make a large mess, but luckily there is a cookie sheet and lots of paper underneath to absorb the mess. You have to make sure the entire surface is sealed with decopauge glue so you won't get any bubbles. If you see some bubbles surfacing, you can get a straw and lightly blow air through the straw towards the bubbled area. Since I had sealed my surface with decoupage glue first and it was completely dry, I didn't get any bubbles.

It turned out great and I love looking at it and remembering the fun summer we had touring with "the band". I saw many events at the various city fairs around the state while waiting for the band performance. I saw a chain-saw cutting competition, a show-dog jumping competition, a demolition derby, a rodeo, many prize animals, lots of exhibits of fair items like the worlds most organized jar of bottled carrots. There were prize-winning ribs, fried items on sticks, those cinnamon almonds that I loved. One time there was even a mighty micro-burst storm that demolished all the portable canopies at the fair and luckily the stage was a permanent structure so it all worked out as we all hung onto the canopy over the sound equipment. These are all things I would have never experienced if not for that summer of Americana.

I saw lots of great families enjoying the time together and grew very fond of this slice of Americana and have vowed to get a big buckle!

Maybe something like this:

Here's a link to a great tutorial that does a good job of explaining the basic process. It's for making coasters on tile, but the process is the same. Yee-haw!!!!

Friday, April 20, 2012

Taking the Tim Holtz Chemistry 101 Course!

My  tags from the Creative Chemistry 101 course. Never got to post them to the gallery as I took the class late and the gallery was closed.

Tried to post them to the current Summer of Creative Chemistry Challenge 2016, but you can only post new tags created just for that particular challenge so they removed my link. It's ok, I don't need to play along.

So here are my tags for my reference only.

I look back at them with fondness as I was just learning.


  Yes, the black tag is ugly, but I have to laugh at it now. You can't see the shimmer in the photo. Got carried away with the colors and it turned out black. I learned the technique though. I'm a believer in enjoying the process, and in my case I enjoyed the process to blackout! Now I have a great technique for a spooky Halloween background!


Saturday, October 22, 2011

My Owl Family - from Oct. 2010 Crochet World pattern

I love my Owl Family I made using a crochet pattern in the October 2010 Crochet World Magazine. You can purchase this old issue for download on their site.

It was an easy pattern and I loved them so I made a whole family. I also made a few that I gave away. I have one on my desk at work too.


Here is another owl, oops, it has no beak. There are several friends still in their eggs. See if you can spot the owl baby. It's the ugly one. The egg chicks are from a pattern in the book Amigurumi World - Seriously Cute Crochet by Ana Paula Rimoli . I have 2 baby chicks, 1 baby duck, and a baby owl. They are sitting upon hard-boiled egg-cup stands.


WHO loves my owl family!

Friday, August 20, 2010

Humanitarian School Kits

Here are some Humanitarian School Kits I made. I took them to the LDS Humanitarian Center upstairs at the Provo Deseret Industries, but they no longer distribute them there. You can still make them for the local charity of your choice though and they are always appreciated!

I have given them away to some local shelter organizations that shelter women and children. I have also given some to a family when their house burned down that had children in school. There may be some local elementary schools in your area that could use these for children that attend the school who are in need. Also local children's hospitals are always looking for items to keep children busy, or for siblings of sick children who may be spending a lot of time in hospital lobby's or waiting rooms while their parents attend to their sick sibling.

The lds website used to have a pattern that I like to use, but they no longer have one posted. I will post the old instructions I use at the end of this post. I have added some comments to the old instructions.


I like to make them with two layers of fabric so they are strong.


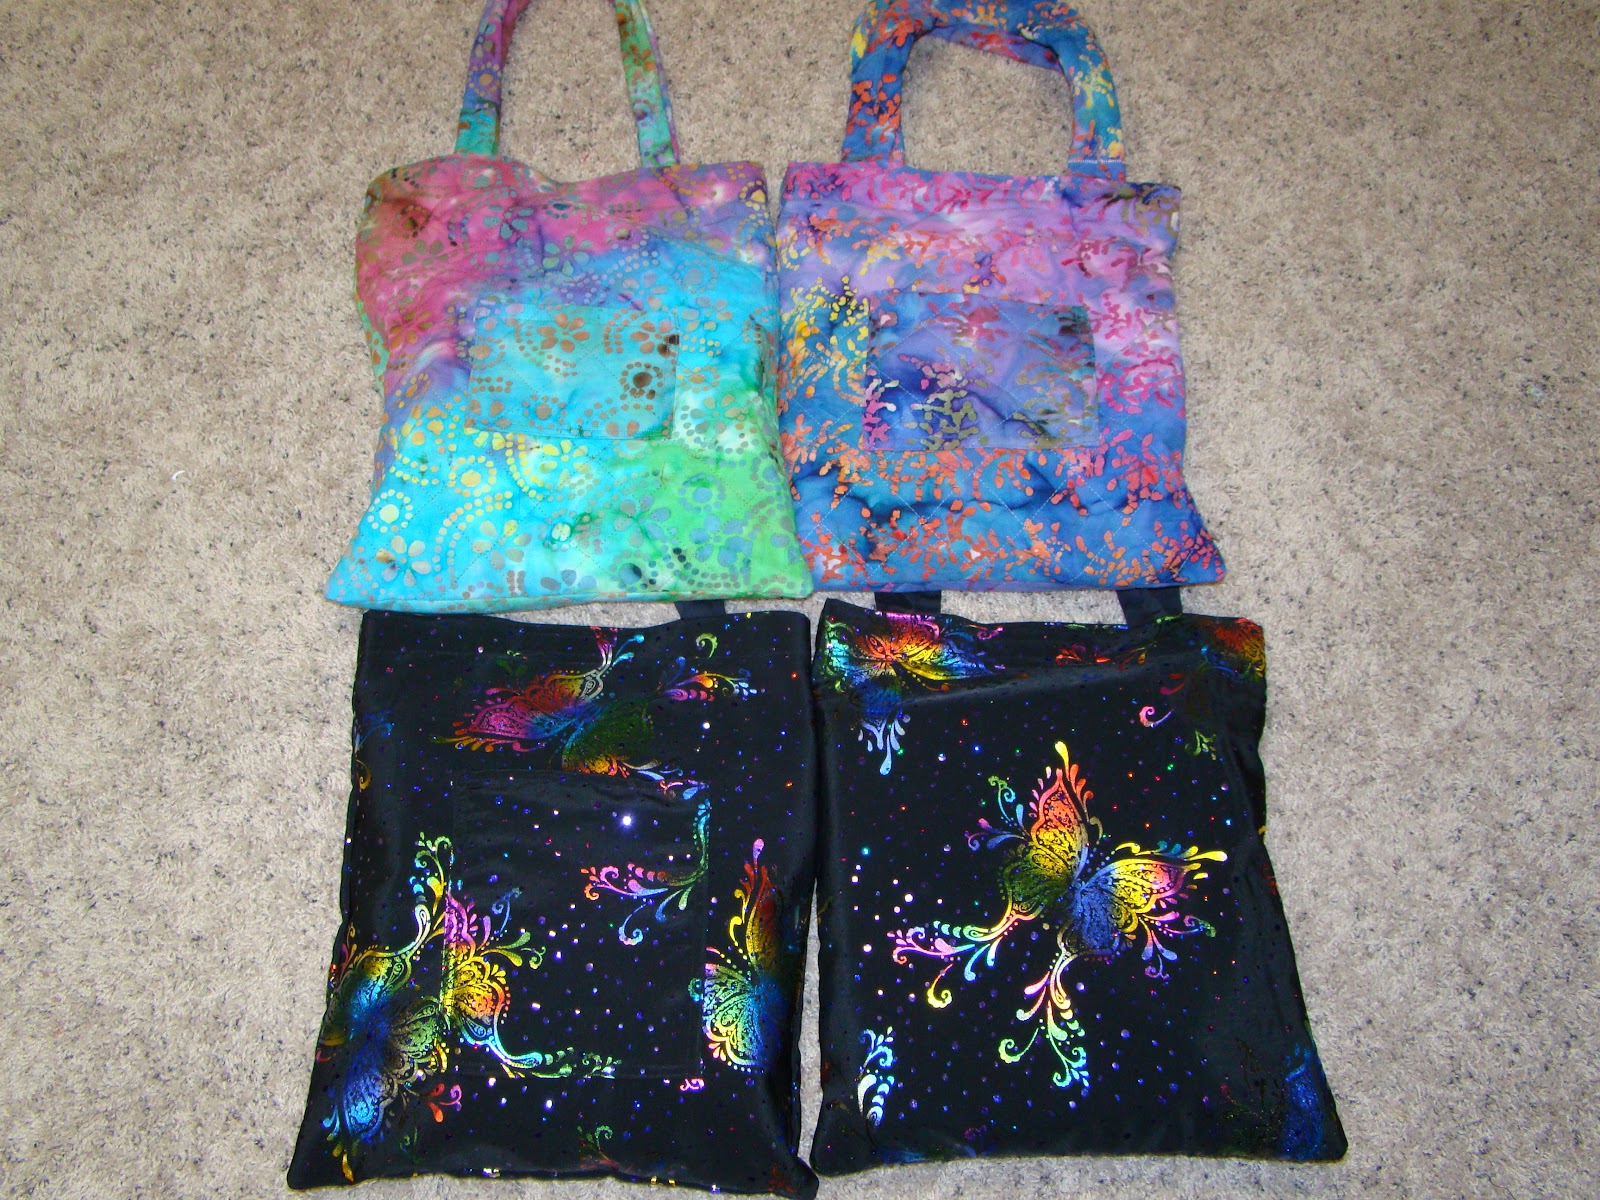
Here's the outside of one bag along with the school supply contents. I followed the Schoolkit guidelines from the LDS Church. Now they have local members make school kits to give to local charities in their own communities.

I added a pocket because when I was 5 years old, my mom made me a similar school bag with a pocket and I loved the pocket! Pockets are for kids to put their "treasures" in, like that rock you found on the way home, or an acorn or some candy a boy threw at your head.


Here's the inside of the bag if you turn it inside out. After I cut out 4 fabric rectangles, I surge a front and back piece together (wrong sides together) to make one piece of fabric for one side of the bag. So I end up with two doubled pieces of fabric which I sew into a bag, so it looks like it has lining.


This bag has a pocket too, but it's hard to see. I glued on a felt butterfly from the dollar store. I hope it stays on.


Here's the dragon school bag. I cut the dragon from some fabric and zig-zag stitched the dragon onto the pocket. Rarrrrrrr, my son would have said. Then he would have gotten the plastic sword and had a battle with our drywall.

Here is the awesome inside of the bag if you turn it inside out!!!

Here is another dragon schoolbag.

Usually I make the bags out of brigher colored fabric, but I had some denim so I used that with colorful lining.

The straps are serged on one side, then I fold the strap into thirds and sew it. Pretty easy. If you try to make one, you'll get the hang of it.

I like to take my time and make the bags strong. Picture kids skipping home from school swinging their bags all the way home. That's why I like to make them pretty strong.

You will have fun making these. They are not very hard and you can pick up school supplies on sale here and there.


School Kit Instructions
School kits are often sent to schools, and orphanages, or local groups in need. On occasion school kits will be sent to disaster areas.

Place the following items in a durable cloth bag (see photo & instructions)
  • 4 unsharpened pencils
  • 1 rubber pencil eraser - approximately 1x2 inches
  • 1 pair blunt nosed scissors with metal blades
  •  pencil sharpener
  • 1 straight edge ruler - 12 inches, with metric
  • Glued or spiral bound notebooks with lined sheets, 8 x 10 ½, or 8 ½ x 11 inches. Notebooks should total approximately 450 sheets. Do not include more than 6 notebooks
  • 1 set assorted colored pencils, at least 12 per set, approximately 7 inches long

Making cloth bags for school kits

Bag
  • Cut one piece heavy, durable fabric 14x36 inches or two pieces 14x18 inches. (I use 2 layers of fabric for each side, with wrong sides together as the piece of fabric for one side, so it looks like the bag has lining.)
  • If you want to add a pocket, cut out a pocket and sew it onto the bag now, before you sew the side seams. My pocket sizes vary, I just make them whatever size I want, depending on what fabric I have. Decorate the pocket before sewing it onto the bag.
  • With right sides together, sew side seams and across the bottom, ½ inch seam
  • Serge or zig-zag all seams
  • Serge or zig-zag around the top opening of the bag
  • Turn top hem down 1 ½ “ and sew
Handles
  • Cut two handles 24x3 ½ inches (1 inch webbing may be substituted )
  • Fold long sides in ½” then fold in half, lengthwise and sew down both long sides
  • Attach and reinforce handles 2” from side seam along hem. Repeat on opposite side. Handles should be able to hang comfortably over a shoulder like a purse, length about 21” long.
  • Sew a 3” strip of Velcro on inside of bag between handle straps
Quilted tie-dye fabric school kits

Metallic Butterfly fabric schoolkits

School kits with supplies

Saturday, July 24, 2010

Humanitarian Dollies

The Humanitarian Center in American Fork Utah is making dollies to send to countries to teach how to care for children and to bring hope to those who need it. The center has patterns and if you go to the center you can help make the dolls.
I make the dolls at home and send them with my neighbor who serves there every wednesday.

The Humanitarian Center in American Fork Utah is open on Wednesdays from 9:00 am to 1:00 pm. The group is non-denominational, but meets at the American Fork East LDS Stake Center, 825 E. 550 North, American Fork.

Here is an article about the Humanitarian Center.


I love these little ladies, so before I give them away I have to take a picture of them. Goodbye dollies. I'm sure you will be well loved.
Related Posts Plugin for WordPress, Blogger...