
So far I've made the "Spooky Ticket Booth", the Carousel Entrance, and the "Haunted Carousel" pieces. I'm hoping to finish one more piece by Halloween.
It's been tons of fun so far. All the instructions are on the Halloween Carnival Event blog. Many of the supplies needed are just old cans, and old cake pan, and old pie pan, cardstock, scary paper, glue and spooky items from your spooky Halloween stash. Other items can be found at Alphastamps!
Here's what I've finished so far...
The Scary Ticket Booth

Here's the spooky ticket booth! The bottom is part of a salt container and the top is a water chestnuts can. The rest is spooky halloween cardstock, and some chipboard. (OK, I didn't use chipboard, I just used the cardboard from the back of a new shirt to make the back of the ticket booth.) The Tickets sign is from the Halloween Carnival Event graphics set.


I made the skeleton candle from a skull bead and some polymer clay I molded like a candle. The wick is some black wire. The dish is a jewelry finding. I made it on the dish and popped the whole dish, bead, and clay in the oven and baked it for 15 minutes. The pumpkins are seed pods that look like pumpkins you can order from Alphastamps (pumpkin pods).

The witch weather vane I made using some wire I poked into the top. Then I put a bead on the wire, then a spinning propeller. I glued two beads together and paper punched out some witches and glued them together so they were stiffer and glued the witch onto the top of the two beads. After the witch was dry, I placed that on top of the wire so it spins. The propeller spins too! The cone on the roof is just a paper mache cone that I cut down a little. The witch paper punch is from Fiskars.
The Carnival Entrance


Here's the second bench I made. The witch is made from felt and pipe cleaners using the book Felt Wee Folk-Enchanting Projects by Sally Mavor. I added the witch bead head from Alpha-stamps. I made her broom out of a stick and some raffia I had lying around.

The Haunted Carousel


Here's a movie of the carousel in action. Keep in mind that this is just made of junk, glue, and paper.
The song is called "Calliope of Death" and is available on itunes.
The Umbrella
I finished an umbrella that goes next to a bench. The stand is made from a spool and a festive paper soda straw. The umbrella is from a free umbrella paper template on the Halloween Carnival Event blog. I used glossy accents to stick it together. A wooden skewer holds up the umbrella. Then I just slid the skewer into the umbrella stand. (So the umbrella is removable...in case of a wind-storm ha-ha.)


The Boo Bash

I got a little carried away with the roof on my "Boo Bash" pavillion. I created a little platform that is sitting on top of a glittered styrofoam ball. I got a bag of the glittered balls at Hobby Lobby which were very handy in making my carnival because you can poke wires into them. I used some for the bench legs as well. I glued the balls on top of my wooden circle platform and then stuck the Jolee's dimensional embellishments into the little balls. The embellishment set came on wires to poke into floral arrangements, etc. Perfect! Then I made a little spinner propeller for the top as well.The propeller really spins. Excellent!
I added a microphone graphic for the grumpy pumpkin performers.

"We are the Strike"
So I decided my son's 9-piece band "We Are the Strike" should perform with the Grumpy Pumpkin Trio for one night only, Halloween! Here they are headlining in the Spooky Carnival.
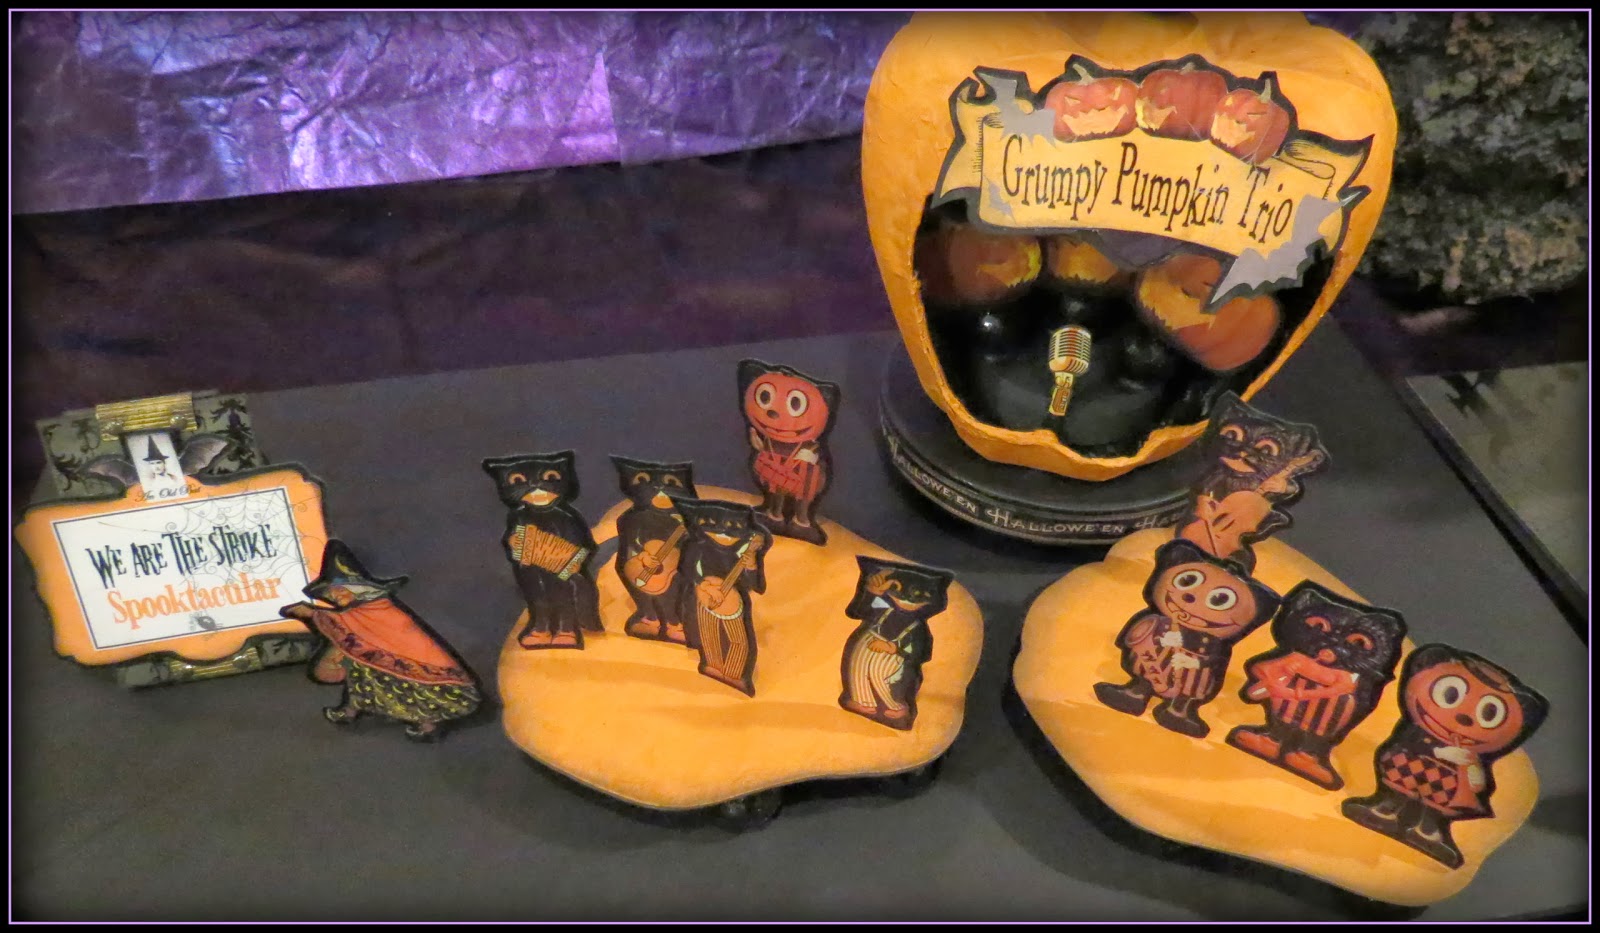
I created the stage platforms using the Tim Holtz Large Pumpkin die. I used more styrofoam glittered balls for the stage legs.

I made the sign support from chipboard covered in paper. I have an old Sizzix hinge die that I used to cut some hinges out of metallic paper that hold the three pieces of the sign support together. I punched through the chipboard with a 1/8 hole punch and used tiny brads to stick the hinges to the chipboard. It's hard to see the little sign platform but it's very dimensional, like a real sign easel made of wood.
I used some graphics from Little Dreamer Designs to make the sign, plus I added my own graphics in photoshop.
Looks like a ghoulish party to me!

Here's a link to the real band's website: "We are the Strike"!
Here they are playing a cover of Benny and the Jets, with the lead singer of "Chicago".
The Steampunk Spells Train

I purchased a small plain wooden train from "Toys R Us" to decorate for my spooky carnival. I painted each train car. Then I cut out and glued on paper from the 8 X 8 Steampunk Spells paper pad, and some from the 6 X 6 Authentique "Enchanted" paper pad. The train is adorable and creepy! I still have to finish two more train cars. Here is the train so far.

I ran out of the Tim Holtz mini-gears, but I plan on putting the gears in the center of each wheel like I did on the train engine. I will also add characters inside the train. Still a work in progress.


That's it so far... I will post more as I finish.
I am in awe and amazed at the detail and the mystique.
ReplyDeleteTo make that carousel even more horrifying it turns backwards!
I really enjoyed the video and the music! Love your work - the carousel is just wonderful!
ReplyDeleteAwesome motorized carousel, and carnival pieces. LOVE the felt witch, and benches! :)
ReplyDeleteVickiR in OH
Great job Vic. Love your pieces.
ReplyDeleteI love your carousel so much. I might be inspired to make one now that I see how nice yours came out.
ReplyDeleteYou made such a wonderful Carnival! I love that train! Great idea!
ReplyDeletehugs Karen