I am participating in the Compendium of Curiosities III Challenge on the Studio L3 blog by Linda Ledbetter. Challenge 5 focuses on the distress watercolor technique found on page 39 of Compendium of Curiosities 3 by Tim Holtz. Challenge 5 is sponsored by Inspiration Emporium, and also by Mario Rossi and Tim Holtz!
I have been learning a lot participating in all of the 5 challenges so far. I had fun completing my Tim Holtz 12 tags of 2014 June tag where I used a circus theme, so I decided to continue the circus theme for this challenge using the distress watercolor technique on each side of the project. It's kind of a circus train-cart-trailer-monument!
The project base is a wooden cube with a round paper mache box lid as the elephant platform. I used the Tim Holtz circle stencil watercolor monoprint technique to make the curtains. I watercolored the steampunk circus ringmaster from my Oxford Impressions Circus stamp set. I also watercolored the words "Life is a Circus". The elephant is a plastic toy that I painted with Modern Masters Copper reactive paint, then while the final coat is still wet, I used the blue patina solution. I made a propeller for the elephant hat out of a pin, beads and a metal propeller embellishment. It spins!
Recognize the Tim Holtz ribbon flags strip die around the elephant platform?Also I made some polymer clay gears for the top of the elephant platform that the elephant is standing on. I'm thinking I'll add some fancy elephant saddle or elephant jewels later. I can never leave the projects alone.
Here's more watercolor on the side.The clown boy, and the dog with juggling balls are water-colored. The poster is distress inked. See the elephant riding 2 bicycles.
Here's another curtain on the other side. I saw this effect in the latest July "Craft Stampers" magazine. The trapeze girl, circus banner, and "Send in the Clowns" are from the Oxford impressions circus stamp set. I have 2 of the circus stamp sets! The monkey is a free graphic from the internet.
Sorry elephant for the unflattering view of this side of the big top cube. The scary lion is an "Industrial Chic" jewelry finding by Susan L. Kazmer! I love the "Industrial Chic" charms! I usually find them at Michaels. The moonface headlights are polymer clay from a mold of various "suns" by Maureen Carlson.The words "Big Top" are watercolored. I have an old polymer clay book Fimo Folk by Maureen Carson where I made a entire witch out of polymer clay. I haven't finished it yet. I started it probably while most of you were in junior high.
I used Tim Holtz gears on the blocks to look like wheels. I was going to use the tim holtz wheels, but it made the circus too tall with the elephant...and the hat...and the propeller!
So I had fun with the watercolors. Perhaps I got a little carried away on this one, just perhaps, but then I just starting playing with stuff and before you know it, I was ready to make a whole circus village. Maybe I'll continue making a few more during some future challenges.
I have had the circus on the mind lately as I've recently found that I am related to the P.T. Barnum "Fat Lady" who was with the circus for 22 years during the 1880-1890's. Crazy huh? She not only was the "Fat Lady" but also learned to be a snake charmer who handled rattlesnakes in her act. (You gotta have a back-up plan in case you lose some weight...gotta learn a trade...like snake-charming.)
So some years back we found an old letter in a box that used to belong to my grandma where my great-great-grandfather mentioned his sister was the largest woman in America at that time which was weird. I researched this a little and couldn't find any info on my great-great-grandfather's large sister. All of my relatives I know on that side are pretty skinny so I though maybe it was one of those untrue family legends. After some research I realized my great-great-grantfather's mother had passed away during the birth of her 11th child, and he remarried and had several more children and she was one of those children. Apparently she took off as a teenager and joined a circus before hitting the big time in the P.T. Barnum circus. Once I found out her name, I found her stage names, then I found some photos and more about her history.
So here's my great-great-great aunt "Lottie Grant" (stage name). Her real name is Elizabeth Charlotte Stice. You go girl! Charm those snakes!
Turns out she married 3 or 4 times, but her husbands kept dying tragically in circus related accidents, and she had 4 children. She died at age 45 from a heart condition, but she certainly lived her life to the fullest and enjoyed the limelight.
Here is a little history and bio on her.
It's just crazy!
You never know what you are going to find when you do family history!!!
Tuesday, July 1, 2014
Saturday, June 28, 2014
June 2014 Tag - Life is a Circus Watercolor!
I tried out the watercolors following the Tim Holtz June - 12 Tags of 2014 tutorial! The technique is also in the book "a compendium of curiosities vol.III" by Tim Holtz. Such a handy reference of creative techniques! I love this book!
Here's my Circus Tag!
I had so many cute circus stamps that wouldn't fit on the tag, so I will have to make another circus project soon! I love the slightly demented-looking rusty clown embellishment at the top! I found the creepy clown embellishment on etsy, there are still some left! Here's a link to the cute baby elephant graphic I used from Free-Image-Friday at Land of Nod Studio's blog!
I've always enjoyed the oddities of the circus. Once during a "sick day" I watched all the episodes of the reality tv series "Circus" and was fascinated.
I also have a bit of the circus in my heritage. My great-great-great grandfather had a step sister of German descent that was a rather large and hefty woman, he wrote in a journal. As his family was preparing to go out West across the American plains, his family had to stay behind while a special covered wagon was constructed for her large size. She eventually made it across the plains becoming the largest woman to cross the plains by covered wagon (from his journal), and she later joined the circus where she hit the big time becoming the original "fat lady" of the Barnum and Bailey circus. You never know what you're going to find when you do family history! =)
Someday I hope to find a photo or drawing of her in some archives somewhere, but for now all I know is what was written about her in my ancestor's journal.
Update: Great-great-great-aunt "Lottie Grant" (stage name) grave and bio. I found out that she also learned to be a snake charmer as well. What a life! Lottie Grant photo.
Even though I am not of unusual size, I can identify as sometimes life can be just as odd as the strangest of circus attractions!
So I had fun making this tag, and hope to make a few more circus projects!
It was fun getting out the ink and water coloring. I'm becoming more confident with stamping and hope to someday master the process, but am still kind of uncoordinated at the stamping.
Then again, I might join the circus. I'll go work on my juggling!!!
Sunday, June 15, 2014
CC3C Challenge 4 - Bronze Egg with flying things
I'm participating in the Compendium of Curiosities 3 Challenge on the Studio L3 blog by Linda Ledbetter. Challenge 4 is sponsored by The Funkie Junkie with additional prizes also from Tim and Mario! Challenge 4 is all about the Stencil and Texture Paste technique found in the Tim Holtz book Compendium of Curiosities 3 on page 49.
I've always been an admirer of the ancient fine art bronze statues in museums. Here is an example, a Hellenistic or Roman bronze lion protome, circa 1st Century B.C.-1st Century A.D, 17 1/2 inches long. At auction, it sold for $98,000, although it was valued at up to $200,000.
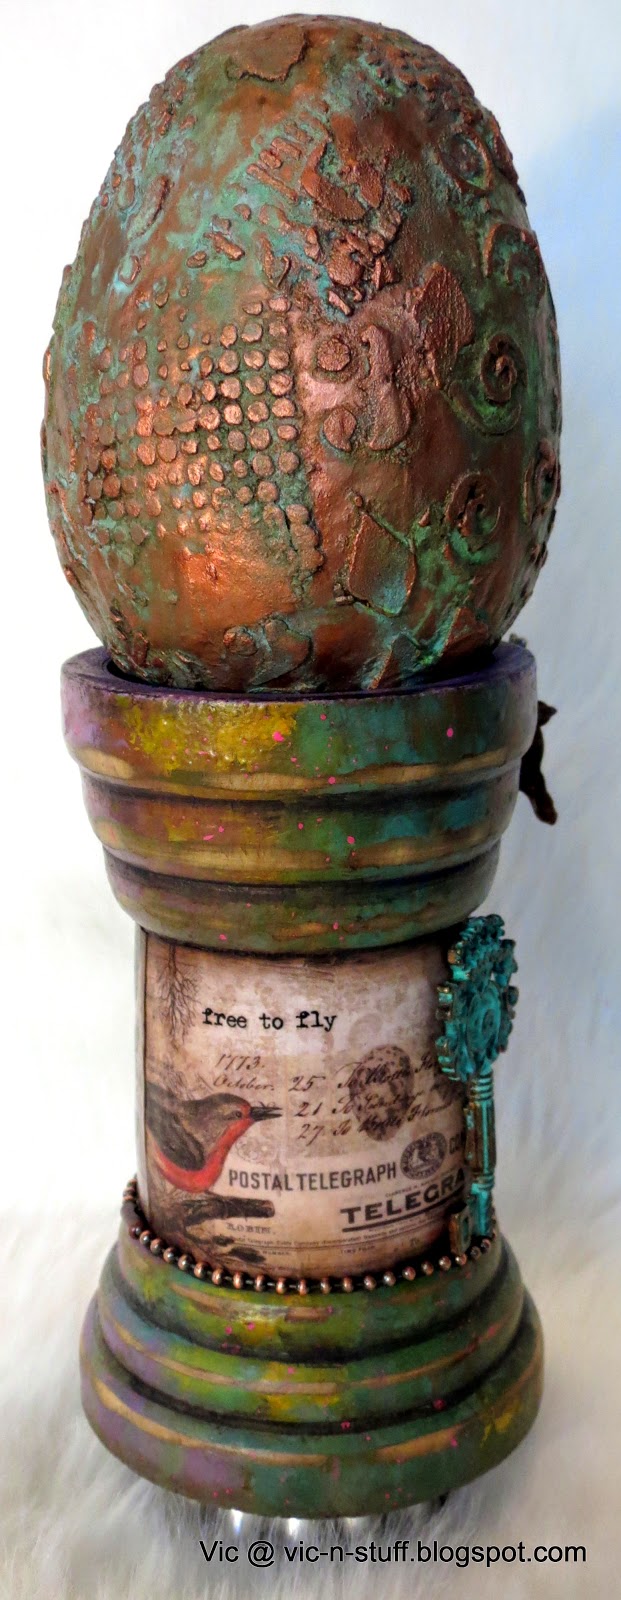
I have so much respect for fine art sculptors and have always aspired to be a sculptor in my own goofy way. I thought why not create my own fine art bronze statue using the stencil and texture paste technique. I call it "Bronze Egg with flying things". Ok, it's not really fine art, and it's copper instead of bronze, but the egg is deceivingly metal looking and you are surprised when you pick it up at how light it is as it's only paper mache.
It took a long time to finish the egg as it was hard to do the technique on such a curved surface so I could only do a small section at a time, so it took a few days to get the egg covered. I didn't stick the egg down to the holder as I wanted to be able to pick it up and look at it whenever I wanted to.
While making this project, I found out that there will be a new grand-baby in our family, the first child for my son and his wife! To me the egg represents the wish for this new little life in our family, hope for the joy this new life will bring, and that this new little person will someday be able to "fly" which is to become all he or she is capable of becoming. I planned on creating something else, but it just kind of turned into this as life events unfolded.
It all started when I went to Hobby Lobby and was wandering down the bargain isle looking for some cheap stuff to alter. I found this wooden object that looked interesting as it had a cup like indent on the top. It also has a hook for hanging on the bottom and I was confused as to why you would want to hang this wooden object horizontally from your wall. Maybe it's obvious to everyone else what this is, but I was thinking the only purpose I could see was to hold an egg, so I found a large paper mache egg that fit inside and I was content. Mostly because the wooden object was priced at $3.00. Wahoo!
So then, I was playing around with some faux finishes and had been experimenting with rusting things, and making some patinas which led to the rusted plastic pig which I determined should fly and be part of the wooden object. So my dream of creating a faux "fine art" piece was shot down by my excitement over rusted items made of plastic and faux antiques. Oh, well.
For the stand I used a different colors of distress paint and I marbled it and let it drip all over. Then I sanded it after it was dry. I also shaded the carved parts with watered down black soot distress paint.
I covered the middle section with paper from the Tim Holtz Wallflower 12 X 12 paper pad, and distress inked it with walnut stain which is my favorite distress stain besides black soot.
I used some Tim Holtz remnant rubs for the words. I used some Tim Holtz ball chain to hold some jewelry charms I had that already had a green patina, and a key embellishment with green patina I already had.
So this project kind of evolved and didn't turn out anything like my original intention but I'm happy with the project as it makes me happy and that's why I create things.
Also ever since I saw Linda Ledbetter's pig with roses from Challenge 3, and Anita Houston's flying pig for the Vintage Journey site I couldn't stop wanting to have a pig in my project.
The Compendium of Curiosity 3 challenges have been very fun as everyone is so creative and talented. It's fun to post along side all of you!
Through the Compendium of Curiosity 3 challenges I found out about the site A Vintage Journey where they create and share project inspired by the style and techniques of Tim Holtz. Their challenge 8 is -- Wings and Things. I have shared this project on their site as well as it is very inspired by Tim Holtz as most of the techniques used are from Creative Chemistry 1 and 2, or the Compendium of Curiosity books.
I've always been an admirer of the ancient fine art bronze statues in museums. Here is an example, a Hellenistic or Roman bronze lion protome, circa 1st Century B.C.-1st Century A.D, 17 1/2 inches long. At auction, it sold for $98,000, although it was valued at up to $200,000.
It took a long time to finish the egg as it was hard to do the technique on such a curved surface so I could only do a small section at a time, so it took a few days to get the egg covered. I didn't stick the egg down to the holder as I wanted to be able to pick it up and look at it whenever I wanted to.
While making this project, I found out that there will be a new grand-baby in our family, the first child for my son and his wife! To me the egg represents the wish for this new little life in our family, hope for the joy this new life will bring, and that this new little person will someday be able to "fly" which is to become all he or she is capable of becoming. I planned on creating something else, but it just kind of turned into this as life events unfolded.
It all started when I went to Hobby Lobby and was wandering down the bargain isle looking for some cheap stuff to alter. I found this wooden object that looked interesting as it had a cup like indent on the top. It also has a hook for hanging on the bottom and I was confused as to why you would want to hang this wooden object horizontally from your wall. Maybe it's obvious to everyone else what this is, but I was thinking the only purpose I could see was to hold an egg, so I found a large paper mache egg that fit inside and I was content. Mostly because the wooden object was priced at $3.00. Wahoo!
So then, I was playing around with some faux finishes and had been experimenting with rusting things, and making some patinas which led to the rusted plastic pig which I determined should fly and be part of the wooden object. So my dream of creating a faux "fine art" piece was shot down by my excitement over rusted items made of plastic and faux antiques. Oh, well.
Small plastic toys rusted with modern masters iron paint, and rust solution.
Small plastic toys with modern masters reactive copper paint and green patina solution.
Rusted plastic pig, dry-brushed with metallic pink paint, and plattered with pink paint. The wings are jewelry parts. There is some bling behind the pig. I refrained from using glitter which was hard.
(side view)
For the stand I used a different colors of distress paint and I marbled it and let it drip all over. Then I sanded it after it was dry. I also shaded the carved parts with watered down black soot distress paint.
I covered the middle section with paper from the Tim Holtz Wallflower 12 X 12 paper pad, and distress inked it with walnut stain which is my favorite distress stain besides black soot.
I used some Tim Holtz remnant rubs for the words. I used some Tim Holtz ball chain to hold some jewelry charms I had that already had a green patina, and a key embellishment with green patina I already had.
(back view)
So this project kind of evolved and didn't turn out anything like my original intention but I'm happy with the project as it makes me happy and that's why I create things.
Also ever since I saw Linda Ledbetter's pig with roses from Challenge 3, and Anita Houston's flying pig for the Vintage Journey site I couldn't stop wanting to have a pig in my project.
The Compendium of Curiosity 3 challenges have been very fun as everyone is so creative and talented. It's fun to post along side all of you!
Through the Compendium of Curiosity 3 challenges I found out about the site A Vintage Journey where they create and share project inspired by the style and techniques of Tim Holtz. Their challenge 8 is -- Wings and Things. I have shared this project on their site as well as it is very inspired by Tim Holtz as most of the techniques used are from Creative Chemistry 1 and 2, or the Compendium of Curiosity books.
Tuesday, June 3, 2014
CC3C Challenge 3 - Faux Tea Rose Memory Box
I'm participating in the Compendium of Curiosities 3 Challenge on the Studio L3 blog by Linda Ledbetter. This Challenge is sponsored by The Inspiration Emporium! Challenge 3 is all about the Faux Tea Rose technique found in the Tim Holtz book Compendium of Curiosities 3 on page 65.
It's been fun to finally learn how to make the tea roses. It's pretty easy once you learn the technique in Tim's book. I practiced a few weeks ago during the Tim Holtz 12 Tags of 2014 April tutorial.
My grand-daughter "Tessie" recently had her portrait taken in a fancy dress. Since she is a 21 month old toddler, the last thing she wanted to do was sit still for a portrait. Once I saw these photos I could not believe how cute they turned out, especially the serious poses where she really wanted to bolt out of there.
I had to make something vintage looking with tea roses and these portraits, after all, I have loads of scrapbook supplies and I hardly ever actually make scrapbook type art with my supplies. So I made this memory/treasure box in honor of adorable Tessie!
I wanted the photo to be the star so I didn't want to make it too gobby. I covered the paper mache box with scrapbook paper. The frame around the photo is grunge board embossed with the dot embossing folder and painted with distress paint. I sanded it a little and used distress ink to make it look old.
I decopauged over the photo and paper, but not the embossed frame.
Then I decorated the top of the box with tea roses and embellishments glued on with glossy accents.
For the inside of the box, I used a close up framed with the Tim Holtz ornate frame die. I wanted the box to be smooth, so I decorated it with a bunch of scrapbook stickers I had in my stash of supplies.
I spelled "Tessie" using letters cut with the Tim Holtz wordplay die.
It was fun making something with real photos, and also something with a purpose. Usually my creations are kinda of wacky, so this was a different project for me.
Now I will tell you about little Tessie. Tessie likes to enjoy every bit of the day to the fullest! She is very curious!!! She does not want to take naps for fear that she may miss something fun. Tessie loves rocks. She likes to kick a ball in the backyard. She likes to swim with her snazzy life jacket. She likes to point to all the birds that fly by and talks to the birds that come to sit on her fence.
Tessie is fiercely independent and likes to do everything herself. She thinks she's an adult and is insulted if you treat her like a baby. Tessie parade waves to passers by while in her stroller. She likes to hold her baby brothers hand or his foot while relaxing with the occasional bottle of juice. Tessie likes technology and is a button pusher. She will steal your iphone, or ipad when you are not looking and has been known to somehow purchase apps or take photos. She will always swipe your drink. She likes to clean, but she must do it herself. Tessie makes a mess everywhere she goes, but then she likes to clean it up if it involves washing with water, or sweeping with a broom, or using a scrub brush. Tessie likes to dump the trash. She likes to read books. She likes to share her food with you.
Most of all Tessie loves people and she loves to be happy! She loves to dance and help mommy and daddy direct plays at the theater. She dances along with the cast.
She loves the dances in Mary Poppins and likes to tap dance with her daddy. Her favorite song is "What Does the Fox Say". Tessie was in a "Harlem Shake" video when she was a few months old. She likes to color. She likes the 3 little pigs and Curious George. She loves to help. She likes to put on her "makeup" with mommy in the morning and knows how to use all the different makeup containers and brushes. Good thing the lids are on tight!!!
Tessie likes to tell stories using one word at a time, or with lots of words we can't understand. Once she was distraught about some people who came to trim the large branches off of some trees. She was worried about the birds. She worries about the big bad wolf and blames all construction messes in the city on him. She doesn't like the wind.
Most of all Tessie reminds me of all that is good in the world and I cherish the sticky handprints on my work jackets and the dirt on my pants from shared rock presents!
Thanks for the faux rose challenge and the opportunity to learn and share with all of you!
Thanks so much for all the nice comments about my balloon in the glitter challenge and to the Curiosity Crew!!! I have been inspired by all the amazing artwork and aspire to be as cool as you someday!
XOXO!
It's been fun to finally learn how to make the tea roses. It's pretty easy once you learn the technique in Tim's book. I practiced a few weeks ago during the Tim Holtz 12 Tags of 2014 April tutorial.
My grand-daughter "Tessie" recently had her portrait taken in a fancy dress. Since she is a 21 month old toddler, the last thing she wanted to do was sit still for a portrait. Once I saw these photos I could not believe how cute they turned out, especially the serious poses where she really wanted to bolt out of there.
I had to make something vintage looking with tea roses and these portraits, after all, I have loads of scrapbook supplies and I hardly ever actually make scrapbook type art with my supplies. So I made this memory/treasure box in honor of adorable Tessie!
I wanted the photo to be the star so I didn't want to make it too gobby. I covered the paper mache box with scrapbook paper. The frame around the photo is grunge board embossed with the dot embossing folder and painted with distress paint. I sanded it a little and used distress ink to make it look old.
I decopauged over the photo and paper, but not the embossed frame.
Then I decorated the top of the box with tea roses and embellishments glued on with glossy accents.
For the inside of the box, I used a close up framed with the Tim Holtz ornate frame die. I wanted the box to be smooth, so I decorated it with a bunch of scrapbook stickers I had in my stash of supplies.
I spelled "Tessie" using letters cut with the Tim Holtz wordplay die.
It was fun making something with real photos, and also something with a purpose. Usually my creations are kinda of wacky, so this was a different project for me.
Now I will tell you about little Tessie. Tessie likes to enjoy every bit of the day to the fullest! She is very curious!!! She does not want to take naps for fear that she may miss something fun. Tessie loves rocks. She likes to kick a ball in the backyard. She likes to swim with her snazzy life jacket. She likes to point to all the birds that fly by and talks to the birds that come to sit on her fence.
Tessie is fiercely independent and likes to do everything herself. She thinks she's an adult and is insulted if you treat her like a baby. Tessie parade waves to passers by while in her stroller. She likes to hold her baby brothers hand or his foot while relaxing with the occasional bottle of juice. Tessie likes technology and is a button pusher. She will steal your iphone, or ipad when you are not looking and has been known to somehow purchase apps or take photos. She will always swipe your drink. She likes to clean, but she must do it herself. Tessie makes a mess everywhere she goes, but then she likes to clean it up if it involves washing with water, or sweeping with a broom, or using a scrub brush. Tessie likes to dump the trash. She likes to read books. She likes to share her food with you.
Most of all Tessie loves people and she loves to be happy! She loves to dance and help mommy and daddy direct plays at the theater. She dances along with the cast.
She loves the dances in Mary Poppins and likes to tap dance with her daddy. Her favorite song is "What Does the Fox Say". Tessie was in a "Harlem Shake" video when she was a few months old. She likes to color. She likes the 3 little pigs and Curious George. She loves to help. She likes to put on her "makeup" with mommy in the morning and knows how to use all the different makeup containers and brushes. Good thing the lids are on tight!!!
Tessie likes to tell stories using one word at a time, or with lots of words we can't understand. Once she was distraught about some people who came to trim the large branches off of some trees. She was worried about the birds. She worries about the big bad wolf and blames all construction messes in the city on him. She doesn't like the wind.
Most of all Tessie reminds me of all that is good in the world and I cherish the sticky handprints on my work jackets and the dirt on my pants from shared rock presents!
Thanks so much for all the nice comments about my balloon in the glitter challenge and to the Curiosity Crew!!! I have been inspired by all the amazing artwork and aspire to be as cool as you someday!
XOXO!
Thursday, May 29, 2014
The British Invasion End Table Flea Market Makeover is Finished!
I'm almost finished with my Flea Market Makeover end table! It's been sitting in my basement only partially finished for the past year, until this spring I decided to finally finish it! Spring is the best time to varnish in the garage before it's too hot during the summer and the varnish doesn't paint on as well. Winter the varnish just freezes and won't ever dry. Spring is just the right time to finish my British Invasion table.
I painted the entire table colonial blue. Then I painted the flag on top with acrylic craft paint. I masked off the stripes with the green painters masking tape and painted each one. for the side flag I glued a piece of scrapbook paper on with scotch quick dry paper glue, just like a scrapbook project. After that was dry I covered the entire paper with matte decoupage medium. Make sure to paint over the edges to seal in the paper. It's ok if you extend the glue an extra half inch past the paper onto the blue paint as the decoupage medium will dry clear and disappear after it is varnished. I did 2 coats of decoupage medium over the paper waiting for it to dry between coats. I love how scrapbook paper looks on furniture!
For the door inserts I used the same decoupage technique with more scrapbook paper. I like to glue on the paper with the scotch quick dry adhesive rather than decoupage medium as the paper is less likely to bubble or tear. Believe me as I have tried this technique on many projects and have learned from my mistakes. As the glue dries you might notice a few bubbles. If you just leave it alone, the bubbles will smooth out after it's dry. Different papers react differently, but I haven't had any problems since I switched to the scotch quick dry method to glue the paper on, let it dry, then cover the whole paper with decopauge medium.
I love the little flea market table now and can't wait to find a location for it in my house! Right now it will have to sit in the garage for awhile until the varnish cures and becomes hard instead of sticky.
I painted the entire table colonial blue. Then I painted the flag on top with acrylic craft paint. I masked off the stripes with the green painters masking tape and painted each one. for the side flag I glued a piece of scrapbook paper on with scotch quick dry paper glue, just like a scrapbook project. After that was dry I covered the entire paper with matte decoupage medium. Make sure to paint over the edges to seal in the paper. It's ok if you extend the glue an extra half inch past the paper onto the blue paint as the decoupage medium will dry clear and disappear after it is varnished. I did 2 coats of decoupage medium over the paper waiting for it to dry between coats. I love how scrapbook paper looks on furniture!
For the door inserts I used the same decoupage technique with more scrapbook paper. I like to glue on the paper with the scotch quick dry adhesive rather than decoupage medium as the paper is less likely to bubble or tear. Believe me as I have tried this technique on many projects and have learned from my mistakes. As the glue dries you might notice a few bubbles. If you just leave it alone, the bubbles will smooth out after it's dry. Different papers react differently, but I haven't had any problems since I switched to the scotch quick dry method to glue the paper on, let it dry, then cover the whole paper with decopauge medium.
I love the clock knob I found at hobby lobby! It goes perfectly with the theme. I think the cupboard door looks like a British phone booth.
I even decorated the inside.
I used scrapbook stickers for the "Keep Calm Carry On" shelf and covered and sealed them with decoupage medium. There is a piece of glass that goes on the top right but I haven't put it back on yet.
Finally after all the decoupage was dry, I varnished the entire project with 2 coats of satin oil based varnish. I sanded it in between coats with very fine sandpaper so it would be smooth, taking care not to sand the decopauged areas. I like the oil based varnish better than water based varnish as it's more durable and just looks better on wood. It's messy on the brushes. Sometimes I put the brush into a plastic bag between coats so I won't have to clean it. Then I either toss the brush, or put it in some brush cleaner to soak and clean later, ha-ha. Sometimes I actually go back and clean the brushes.
I love the little flea market table now and can't wait to find a location for it in my house! Right now it will have to sit in the garage for awhile until the varnish cures and becomes hard instead of sticky.
Before (The price tag says $5.00 LOL)
After!
Wednesday, May 21, 2014
CC3C Challenge 2 - Distress Glittered Butterfly Paper Hot Air Balloon
I'm participating in the Compendium of Curiosities 3 Challenge on the Studio L3 blog by Linda Ledbetter. The Challenge is sponsored by The Funkie Junkie! Challenge 2 is all about the Distress Glitter technique found in the Tim Holtz book Compendium of Curiosities 3.
I wanted to do something vintage with glitter so obviously I decided to create a paper hot air balloon. I created my paper hot air balloon following a pattern and video tutorial by Laura Carson. Here is a link to her blog balloon page. After I made the paper balloon I decorated it with many glittered butterflies using the distress glitter technique in the the Compendium of Curiosities 3 book. The butterflies are cut from grunge paper using the Tim Holtz butterflies movers and shapers die.
For the metal balloon trim and a few butterflies I used the technique I learned following one of Linda Ledbetter's tutorials for "The Spring Zing Wreath" that uses grunge paper, silver foil, embossing folders, and distress paint.
I wanted to be able to hang the hot air balloon, or have it stand up by itself so I strung a string into the top of the balloon secured by a large bead on either side. You have to secure the beads before you glue the final side of the balloon as the balloon opening at the bottom is too small to get your fingers up into once it's finished. (I know this from experience). I used some very soft wire to make the balloon "rope" so it can stand up by itself. You can just use string or chain if you only want it to hang. It took some doing to get the wire right (if you can call that "right") =). I made the flowers using the Tim Holtz mini-floral strip die.
My glittered butterfly balloon is all about beautiful courage. Courage can be a little haphazard and slightly skewampus creation, but when we gather up the courage we can muster, we can rise above the challenges we may face in our own way, finding peace and calm as we float high above where the challenges look small.
I have been in a hot air balloon. As you rise up it feels like the earth is moving away from you, and you are standing still, until the things below are small like ants. Courage is like that. As you find your courage, you can stand firm and the challenges move away from you and become small. You can enjoy your beautiful moment. Sure you have to come back down, but then you'll reach for your courage contraption again.
I have enjoyed making my little balloon contraption.
Thanks for the challenge. It's been a fun one for me as there are no goof ups with glitter and all goof ups can be covered up with even more glitter! Bring on the glitter!!!
Tuesday, May 13, 2014
May 2014 Tag - Sailing along with the Tim Holtz tags of 2014
I had so much fun making this project based on the Tim Holtz tags of 2014 for May. It's always hard to part with those embellishments but I did it!!! I have been feeling a little like sailing away across the ocean blue so I thought I could use some of my sea-faring embellishments and charms that I use to make charm bracelets. I also had a few fish stamps that I never use.
Instead of making a tag, I made a "Huge" tag, more like wall art. It's about 10 inches tall. I just cut out a piece of manilla folder for my enormous tag. I mounted the "huge tag" on some wood after it was finished. On the wood I used the technique where you paint acrylic and heat it up to make "blisters". I saw the technique in the latest "Craft Stamper" magazine. (June 2014 issue). It works. I put a little silver rub-n-buff on my finger to accentuate the "waves".
I worked hard to make "water" swirls using distress ink, but I covered them all up. Darn. Next time I'll take a photo first. I used paper from 7-gypsies called "Mariner". I found the image of the woman sailer on the internet somewhere and added the words with photoshop. It's from a T Earl Christy vintage postcard. I didn't have the shadowpress folders so I faked it in photoshop using a drop-shadow and clipping mask. The rest is just like the tutorial!
It was so much fun to make!
I'm not that great at stamping, but I stamped with ranger embossing ink and embossed the turquoise fish with embossing powder and distress powder. The crown fish is a cool stamp. I stamped with the coffee archival ink, with clear embossing powder. Then I used distress ink over it.
The seahorse is a stamp that I stamped with ranger embossing ink, and black fine embossing powder. Then I cut it out and stuck it on with foam dots. The seahorse folliage is from the Tim Holtz pinecone die, leftovers from the pinecone roses in the April tag tutorial.
The glittered shells are from the little pack of plastic button embellishments at the craft store.
Excellent tutorial and a very fun project. No stress when you get to play with treasure. Smooth Sailing!
Subscribe to:
Posts (Atom)