Saturday, July 6, 2013

July 2013 Tag based on Tim Holtz tags of 2013


Here is my July tag based on the Tim Holtz July 2013 tag tutorial!


I tried making stripes with red and blue distress ink with the brayer. It worked pretty well but you can't see it because I ended up covering it with my dollies and other paper. I used the Tim Holtz Seasonal Impressions paper because I had some and they have some Patriotic Sheets. I made a paper flag from some Tim Holtz paper and a skewer stick.

The star is the small sizzix 3-d star die. I covered it with the crackle stuff, so it kind of looks like a tin star, but it's just paper with some cardstock on the back to make it flat.

I love the little vintage paper dolls.


I stamped on the crinkle ribbon and inked it up in red white and blue, like the tutorial!

It's an Inkadinkado stamp called mini patriotic eagle. There are 2 stamps on the sheet. It was $1.99! That's what I'm talking about!


After I posted the above tag, I finished my second patriotic tag! Here it is. 
Lady Liberty!


Then since I was still getting the hang of the ink and brayer technique, I completed my patriotic goofy owl on chipboard.


Happy 4th of July!


Band Update!!!!

Here's a link to my son's band performing at the "Stadium of Fire" celebration opening up for Carly Rae Jepsen and Kelly Clarkson!


Friday, July 5, 2013

Ahoy Mateys - check out the pirate charm bracelet!


This was the first charm bracelet I made back in the year 2009. I had been collecting little beads and charms for several years, but finally dared to put them all together during the boring parts of a car ride to Disneyland in California. I made 2, I have one and my daughter has the other. Notice the black pearls, as I think the Pirates of the Caribbean movies were popular at the time. I was just learning to make bead-drop charms with wire and pliers.

Here's how I made the bead charms

Here's how I put the charms on the bracelet.
(I used the "wreck the fingernails" method to put the charms on this bracelet, but have since purchased the split ring tool which makes it much easier. I used split rings on this bracelet to make the charms more secure as some were heavy. Now I usually just use jump rings and save the split rings for charms that are heavy or need to be very secure.

Here's how to use the split ring tool

Here are the types of supplies you need to make a charm bracelet.


So here are some of my other pirate crafts. During the 1990's my children became pirates for a few years, I think around the time the move "Hook" came out. I made pirate costumes, and they loved the old Martin Martin version of the play Peter Pan we had on VHS. Our family dressed up as pirates for a 4th of July children's parade and won an award for "Best Family Entry" and a trophy. My then 4-year-old son was captain hook riding a tricycle pulling a giant inflatable crocodile on a skateboard following him. I was his sidekick smee on rollerblades. My husband was peter pan on rollerblades and my daughter was tiger lilly on rollerblades. We felt silly, but the children who came to watch the parade LOVED US!!! They thought we were real!

During that time I painted a pirate nutcracker from a pattern by decorative artist Juanita Denton. I love my pirate nutcracker. Brings back good memories!

My pirate nutcracker needs to be dusted very badly!!! He's up on a high shelf so he's hard to reach. I made his hat out of felt and attached some loopy captain hook hair to the hat. He started out as a plain wood unfinished nutcracker from a craft store in Salt Lake City called Zim's. I still have a few unfinished nutcracker projects that I will have to finish one day!


Here are some close-up's of the pirate bracelet

I love the lampwork skeleton beads. I got them at oriental trading but I don't think they have them any more.

 
The monkey makes me laugh!

I Love the carved skull, and the blue lampwork skeleton, and the sand dollar!


I've made many other bracelets since my first pirate bracelets. You should give it a try. Start out with a few beads you like and a few charms and give it a shot. It's very addicting to collect themed treasure. This gives you a chance to wear your treasure, AND it doesn't take up too much space. It's fun!

Sunday, June 30, 2013

June 2013 Tag based on Tim Holtz tags of 2013


Here is my June 2013 Doodle Bird Tag based on the Tim Holtz June 2013 tag tutorial!


So I really like the new "Smash" owl slider embellishment
from K&Company I had and I was wishing they had a stamp of the image so I could color it for my tag, so I decided to try my hand at drawing a doodle owl with my pens! So buy these embellishments!!! They are so cute!
 I like doodling, and it turned out great! The doodle experiment was very fun, so thanks to K&Company for their great design!!!  I'll be hoping they come out with the stamp someday!!! I already used the smash owl embellishment on another scrapbook project. I tried to make my doodle owl different than the original, but it turned out looking so much like the original I felt a little silly.

So I had to draw a different doodle bird so it wouldn't look so much like the original. Here's my zig water-proof pen version on watercolor paper. I started to freehand it with a pencil first, then I became bold and started to have more fun and just go for it with the pen! Living la-vida-loca with the pen! (I once created a Samoan floor mat on canvas with a sharpie!)

Then I water colored it using pens and the water pen.

Then I had fun painting some tags with distress paints, making another tag with gear patterned paper, then I stamped and embossed over the tag with several colors of embossing powder. Then I used distress inks around the edges. So I'm liking all the color! The Tim Holtz stamp I used is my favorite!!! It's got messy dots and splotches and works for everything so I always end up using it. I also love the gear stamp I have, although I can't remember who makes it. Gears and splotches, love them!

 So here's the doodle owl I used for my original tag that looked so much like the "Smash" owl, I felt bad and couldn't use it.


I wanted the text of the tag to say something about true colors, but I ran out of room on the tags.

So I had fun drawing the great doodle owl, and the doodle bird and thanks to K&Company for the inspiration to get me drawing again, and for the Tim Holtz blog for inspiring me to do my monthly creative post. I'm going to doodle more now, as it's good for the soul!

Update on "The Strike", the band my son is in. Yes!!!! Last night (June 11th) they won the final competition and will be opening up for Kelly Clarkson and Carly Rae Jepsen at  the Fourth of July "Stadium of Fire" celebration!!! It was so exciting!!! All the bands were great so it was an honor to watch everyone who participated, and we are so excited they get to play for a crowd of about 50,000 people next month! Wow!!!!!

Wednesday, May 22, 2013

May 2013 tag based on Tim Holtz tags of 2013


Here is my May 2013 tag based on the Tim Holtz 12-tags-of-2013 tutorial for May!


Here's a link to the big version of the photo of the tag, don't look too close!
 
I really struggled with this tag as the rub-ons were being difficult. The rub-ons do work out nicely as a resist. Mine were old and had lost their stick-um. Then I struggled with my ink colors as well. They were looking kind of drab. I need some more ink colors, so I ordered some. Yay! Then when I stamped with the archival ink over the rub-ons, I couldn't get the ink off the rub-ons like I wanted for a layered effect. I do love the dragon with the bright red embossing powder though! BUT you can't see my fish on the right edge as they are all covered up. I wanted there to be many koi fish.
 
Oh, and then I noticed I stamped the chinese symbols upside-down.  So now you have to stand on your head to have peace, love, joy, hope, or whatever the symbols say.
 
So I breathed in deeply, felt the zen in my tag, and said, "Such is art!" Love the process, right! An artistic project is what it is, a snapshot of a creative moment. 
 
 
I had fun making a few jewelry embellishments that would go with my tag. I planned on using them to cover up the areas that I was not pleased with, but then I decided to enjoy my problem tag, and embellish my mistakes instead of covering them up. 
  
In the end I turned out liking this tag in spite of my trouble. It was a great stress reliever for a hectic week of work and extra-curricular activities.
 
My son's band was participating in a band competition, kind of like a small-scale local American Idol, but with bands. If they win, they will get to open up for Kelly Clarkson at a local concert on the Fourth of July. They made it to the final four groups that are still left in the running, but the whole process involved competition brackets and facebook voting, and mud-slinging comments by voters, and it stressed me out. Glad that part of the competition is over, and they came out of it ok. Anyways, they are a talented group of creative musicians and it would be fun to see them perform at a big venue!!! They write their own music and are all nice college boys that wear suits. I will include a link to their video at the end of the blog.

 
The final four groups will all perform at a local venue in a few weeks, where they will get the final vote from the judges to see which group gets to open up for Kelly Clarkson. Oh, the suspense!

So it was a fun, but stressful week leaving us on the edge of our seats all of the time!

I was very distracted in my projects and couldn't seem to accomplish anything without making lots of blunders.

So here is a Chinese proverb that goes with this month's tag process that used rub-ons.

 A gem is not polished without rubbing, nor a man perfected without trial
Chinese proverb

Take a brief moment here to relax...live in the tag...
feng shui...and all kinds of peaceful thoughts here...

(Victoria in Chinese Symbols)


Here's the band.

Band: The Strike
Original Song: Robbing me Blind
Competition: Stadium of Fire 2013 Talent Competition


Thursday, April 18, 2013

"Fly Free Filly!" - My April 2013 tag based on Tim Holtz tags of 2013

I've been learning how to use the new Tim Holtz distress paint. This is my "Fly Free" tag based on the Tim Holtz tags of 2013. I followed the tutorial and it took some time to get the paint to not become muddy. I "painted" 3 or 4 tags to practice and the backgrounds all turned out different.


It all started out with a horse stamp. The horse ended up looking very "stiff" on my tag. I wanted to give the horse wings, but I didn't have any modeling plastic so I faked it with some regular plastic which didn't work too well. The horse still looked very "stiff", like it didn't want to be on my tag. I decided, "heck with you stiff horse...if you don't even want to be on my tag", so I made another horse, so my original horse could escape my tag. I liked a cardboard horse by Ann Wood, so I used her horse pattern, but made it smaller. You can download the Ann Wood horse pattern here, but look at her display of horses as they are awesome!

So then I decided my "stiff horse" is symbolic of our professional selves when we have to be dignified but we really don't want to be there. Also it looks a little like a "trojan horse" which was just a facade of a horse. Our real self just wants to "fly free" and get out of there. So "fly free filly" is a tribute to that part of us that wants to "fly free" with the wind in our "manes", free to do whatever we want without the limits of gravity even. Filly doesn't even have to be on my tag, and can leave any time. I used re-positionable glue =)


Last month I tried out the tutorial from Linda Ledbetter L3 Studio during the Tim Holtz tattered flower challenge, and I used some leftover pieces for the filly wings. I also used some leftover tattered flower pieces for the filly mane.

This was also my first time trying out the crinkle ribbon. It was easy to use when I followed the Tim Holtz tutorial. I also was playing with the distress powder on the gears stamp, and on the star.

So go ahead and "Fly Free Filly!!!" It's spring!!! Summer is ahead and the grass will be bright green again soon!!! "Fly Free Filly", the tax return is mailed, the Winter Semester is almost finished, let the summer begin!


Thursday, March 14, 2013

So "Hoppy" for You - my March 2013 tag based on Tim Holtz tags of 2013

It's almost spring and my tag is So "Hoppy" for You! This is my March 2013 tag based on the Tim Holtz March 2013 tag tutorial.

Love the tutorials. I love spring and I love bunnies so I combined the two and created lots of bunnies on springs!


First I cut the shape out of chip board, and then cut out the bunny with the vagabond machine. I wanted it to be stiff enough to be able to put fur behind it and have it pop out. Then I stamped the shape with a Tim Holtz stamp pattern and embossed it with orange embossing powder and used ranger distress inks around the edges.


Then I created the tag base just like the Tim Holtz tag in his tutorial.


I wanted to make some hopping bunnies for my tag, so I used a martha stewart bunny punch and punched out some burlap looking paper and inked them different colors. Then I made springs out of wire wrapped around a pen and glued the bunnies on. I used stickles around the edges of the bunnies.


Then I assembled the tag. Here's a huge photo of the bunnies hopping around the green grass on the bottom of the tag.


Happy Easter!!!

P.S. No bunnies were harmed in the making of this tag. I used synthetic fur. 

Sunday, March 10, 2013

Faith and Begorrah, My Lucky Shamrocks!!!

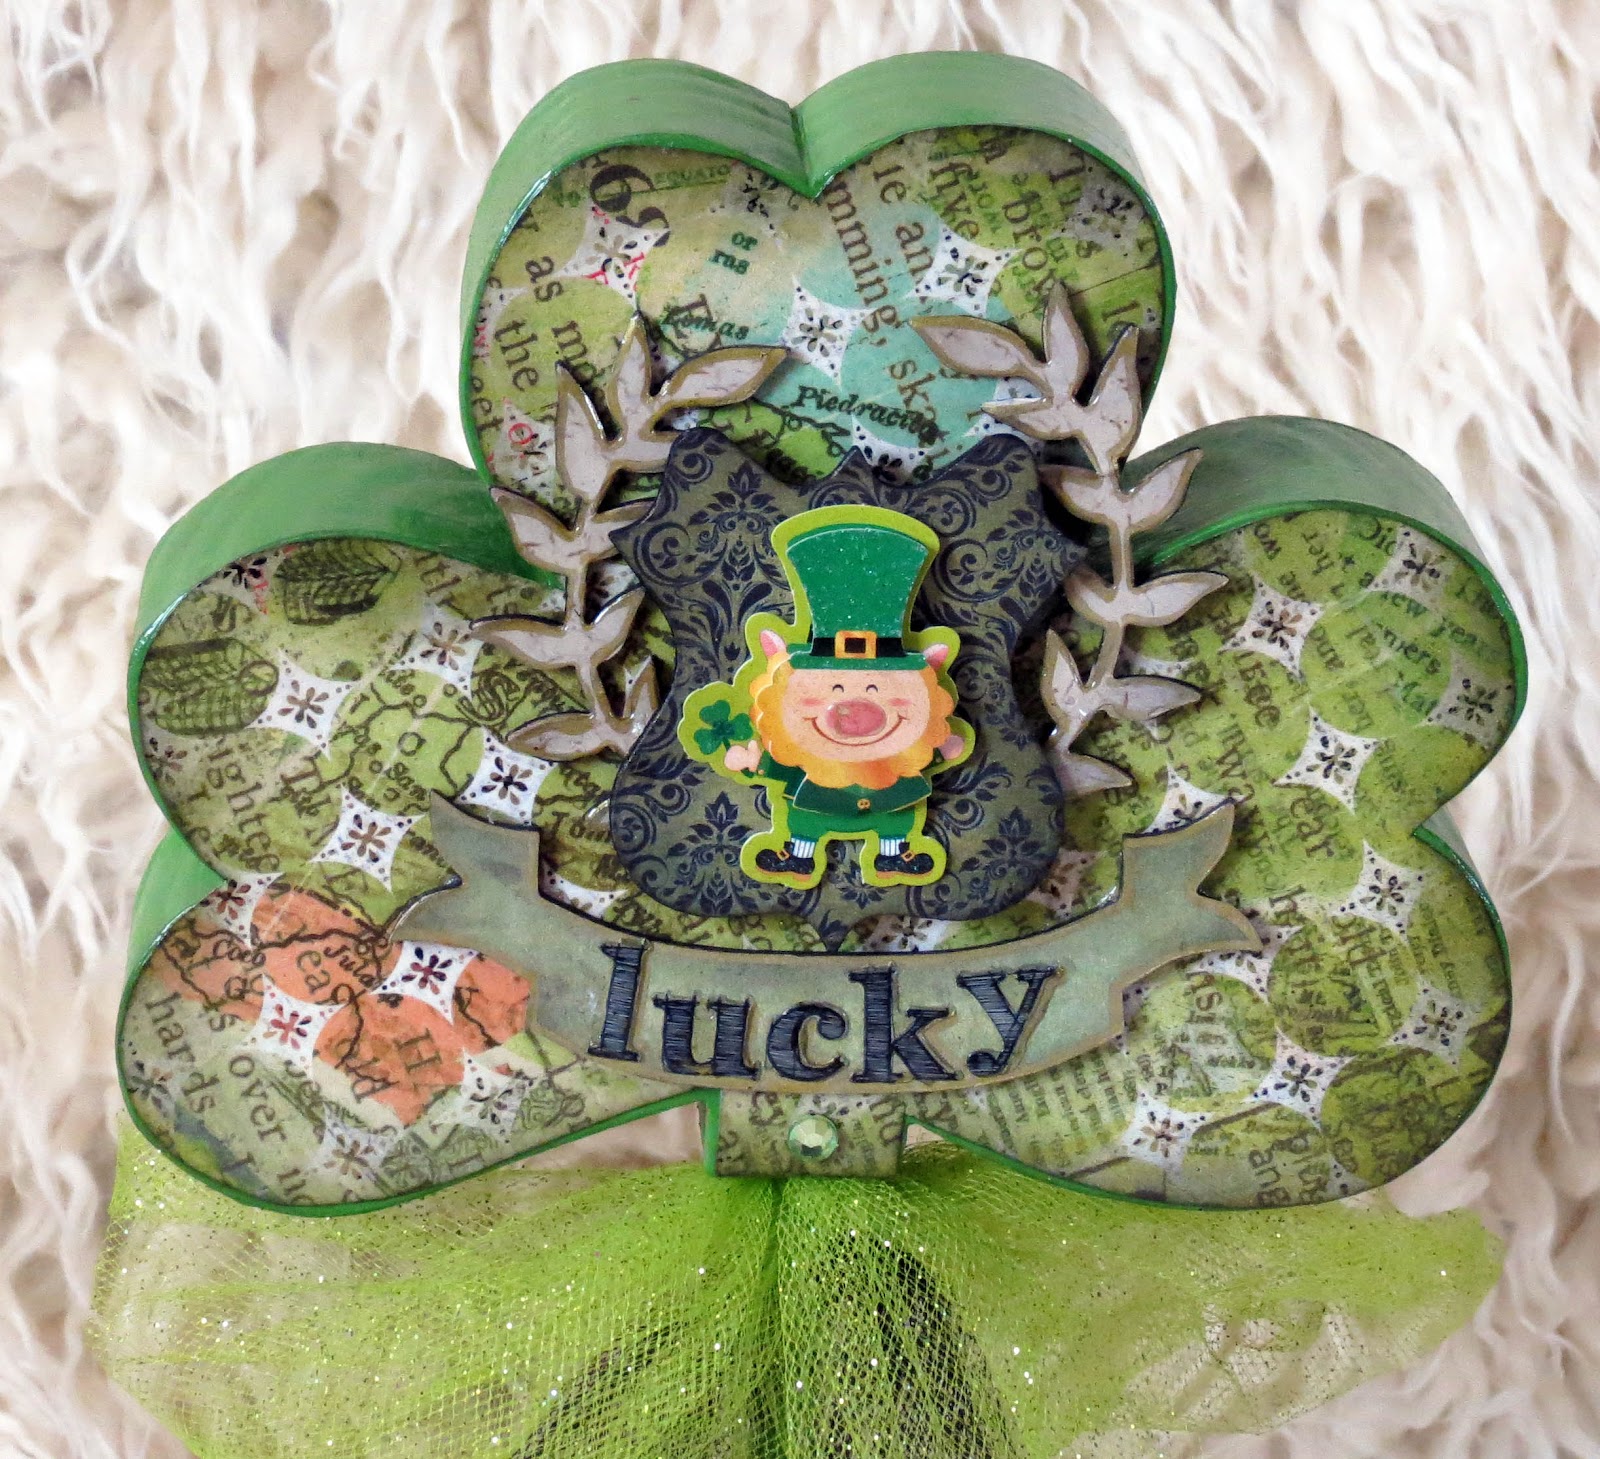
I present my trio of wooden Shamrocks on sticks!!! I purchased the blank wood from Crafty Wood Cutouts.


I painted them all green, and decoupaged scrapbook paper upon them, and then embellished them. (I'm writing this blog with a Scottish/Irish accent.)


The banner and shield are the Tim Holtz Sizzix Regal Crest die that I cut out of chipboard and covered with scrapbook paper. I used stickers to spell "LUCKY" and covered the stickers with glossy accents. My leprechaun is a dimensional sticker. I inked the edges of the scrapbook paper with ranger distress inks before decoupaging them to the paper. I glued some shamrock ribbon and gems to the base and tied some ribbons of black and green sparkled tulle.

I've been enjoying lots of texture lately so I tried to use smooth, rough, shiny, sparkly, matte, solid color, many patterns, slightly distressed with a vintage feel.


I've never been to Ireland, but I would like to go there someday, so I made this my "Explore" shamrock. With any "luck", someday I will be able to hop into my jalopy for an adventure.


Ireland looks very green, so this is my "green" shamrock with a "St Patricks Day" dimensional sticker, glittered flowers, and glitter polka-dots.


Here's the other side of the Shamrocks.


This is the other side of my "Explore" shamrock, except now I've hopped on a "Tractor" of some kind towards a pot-o-gold dimensional sticker.


This is the other side of my green shamrock, but with 3 golden flower, and 3 black flower buttons to mirror the 3 petals of the shamrock, that St. Patrick used to teach about the "Trinity" or so the legend goes. Ok, so there's also a 4-petaled shamrock stamp in the center, but it said Mar 17, and was shiny with the color of green I liked, so I was willing to forgo my symbolism, bear with me.


So my Shamrocks are a tribute to my Irish ancestors, who were actually Scottish, but were born in Ireland, but were members of the "The Church of Jesus Christ of Latter Day Saints" (Mormons). It's all very mixed up, but none-the-less, they were all Scottish people, who were born in Ireland for several generations, and eventually came to America, were persecuted and chased from place to place, and eventually crossed the plains, mostly walking, to Utah where they started printing newspapers, and started up the first local community theater in the desert.

It's a strange story, but it all began with John McEwan, who was only 17 years old. He was the first in his family to leave Scotland and come to America all by himself. He went directly to Nauvoo, Illinois, the beautiful city established by the Mormons.  His parents and the rest of his family came to America, and eventually to Utah several years later.


John McEwan (1824-1878)
Born: Banbridge, Down, Ireland
Lived in Edinburgh, Scotland
Died: Provo, Utah

So Happy Saint Patricks Day to John McEwan, the Mormon Scotsman born in Ireland, who came to America and looks like my brother!!!

He had such beautiful script handwriting, so he was often called upon as a clerk, taking minutes at church meetings, or acting as a scribe, or a record-keeper. 

John McEwan and family were patrons of the arts and literature except in their wild-west sagebrush desert Utah home there were no "arts" to speak of, so they created their own, singing, reciting poetry, telling stories, acting out drama, which eventually led to home-grown community theater presentations in Salt Lake City, Provo, Southern Utah, where ever a branch of the family lived. They also were involved in printing the Deseret News in Salt Lake City, and the Daily Enquirer in Provo as the family knew the printing press trade. 

So I think my ancestors would enjoy my creative projects, so I now recite a poem found with the family journals belonging to John McEwan and his family.

"Look not mournfully into the past, 
    It comes not back again,
But wisely improve the present;
    It is thine.
And go forth to meet the shadowy future
    Without fear and with a manly heart."

Henry W. Longfellow. 
  
And for the rest of us without as much of a dramatic flare, here's an Irish saying that I enjoy...

"Don't be breaking your shin on a stool that's not in your way"

Happy St. Patricks Day, and if you're not inclined to celebrate it, then Happy March to you, and mind your shin!

(A copy of the journal of John McEwan can be found in the L. Tom Perry Special Collections Library, Brigham Young University, Provo, Utah.)
Related Posts Plugin for WordPress, Blogger...