Sunday, November 30, 2014

My November 2014 Tag - Tim Holtz 12 Tags of 2014


I'm playing along with the Tim Holtz 12 Tags of 2014.
Here is my version below. I was off to a late start this month so my tag is a mixture of Fall and Christmas!


The Creative process is not an exact science
I had some leaf dies, and some leaf embossing folders but none of them matched up, so I ditched the whole idea and used an embossing folder I had and just cut out the Christmas Tree shape with some scissors. What-ev. It's vintage, eh?

I followed the Tim Holtz technique pretty closely, substituting with whatever I had on hand. Now where did I put all those Christmas embellishments? I used Ranger walnut stain distress spray, and tarnished brass distress stain. I have obtained a few distress spray stains recently! Still getting the hang of making it spray bigger droplets. I mostly sprayed my hands. More spray on my hands than the cardboard.

I used distress paint on a tag for the tree and used distress ink to highlight the embossed areas.
I had some old gold foil, and I used a stamp that looks like raindrops and embossing ink with sticky powder. The sticky powder works well with the gold foil.


I used some embellishments I had and decided to make a wire hangar so I can hang my decoration up on the wall. 


A Simple Christmas
I like this simple project made from simple materials. I reminds me of the olden days where you could celebrate the holidays by making whatever you have look festive. Even plain old cardboard. 

Christmas Memories and Cardboard
I once made an entire city of Jerusalem out of huge cardboard boxes for a church Christmas party. Cardboard and poster paint. I painted an almost life-size wall of Jerusalem, I'm not kidding. Made signs for all the city shops, like "The Inn", "Cheese Shop", "Lamps", etc. The idea is you go there to be taxed, then the Christmas pageant starts and you are part of the city crowd. Soldiers come around randomly and you have to pay taxes. You can use your roman coins to purchase food at the shops. Our family used to put on this Christmas Party for several years. It was quite a moving event, AND it was mostly plain old cardboard. I have since "retired" the city and no longer put on the program, but I do have fond memories of the good feelings felt by those who attended. It always puts things into perspective. Here is a similar "Return to Bethlehem" event I found on youtube. Here is another one even more similar to ours except with funky music.

When we first put on the program my son was just a little kid of about 4 years old, he has since become a fine musician who is partial to "funky music". Little did we know back then that he would stick with those guitar lessons he started when he was 5. 


The Journey
I always learn something new in my Tim Holtz 12 Tags journey and I had fun trying out some new techniques.

Steam-punk snowflake
I used my steam-punk crocheted snowflake left-over from my spectacular steampunk Christmas hot-air balloon project I did for the Compendium of Curiosities iii challenge #14. Some day I will make a youtube tutorial on how I make the steamp-punk crocheted snowflake, but I'm still figuring out how to explain how I do this.

Thanks for checking out my project. It's always fun to participate in the Tim Holtz 12-tags of 2014 projects! Tim is so creative and I enjoy seeing how different everyone's tag is and how talented everyone is. It makes me happy!

Funky Music
My son's band "The Str!ke" playing the funky version of "God Rest Ye Merry Gentlemen" last year. He's the one with the hat and scarf.


The Str!ke website

Sunday, November 16, 2014

Compendium of Curiosities iii, Challenge 15 - Red Riding Hood & Baby Wolf in Cabinet Card Pocket

I am participating in the Compendium of Curiosities iii Challenge on the Studio L3 blog by Linda Ledbetter. For Challenge 15 we are using the Tim Holtz cabinet card pocket frames as found on page 38 of Compendium of Curiosities 3 by Tim Holtz.

Challenge 15 is sponsored by Inspiration Emporium who will provide a $50 shopping spree for the winner of the challenge, with more prizes courtesy of Tim Holtz and Mario Rossi for the fabulous Curiosity Crew's choice winner! Excellent.

A fairy tale project 
This project turned out to be a story book fairy tale featuring 2 beautiful grand-children as Red Riding Hood, and her pesky wolf little brother! He also doubles as the lumberjack in the story - just in case he hated the wolf hat! He usually doesn't keep hats on very well.


Inspiration behind the project goes to...
I got the idea for the project on the Cackle and Hoot blog by Lora Mahaffey! She did a Red Riding Hood project that I love. Check out her blog as her projects are amazing!

This is a large project using 2 2X4's glued together. The wood turned out to be about 6" X 9". I distress stained all the wooden parts with walnut stain distress ink. Then I glued on some paper, and spattered and distressed it.

Blinged out Cabinet Card
I used the wood grain embossing folder on the cabinet card frame and distressed it. I purchased the "Once Upon a Time" title in the jewelry section of Hobby Lobby and added many dangling charms. I like the paw with bling! Tessie Red Riding Hood was adorable with her basket of goodies. She was in character and was scared that a real wolf might be lurking around the bend. She kept giving me the basket of goodies since I am the grandma. Little Leo wolf was a good sport and kept his hat on for the photos! Fotochic studio had a special $20.00 Halloween event where the photographer shoots photos at an outdoor location for your 10 minute appointment and you get to keep all the digital images!!! It was perfect for toddlers as their attention span maxed out at about 10 minutes of posing! Leo is a famous supermodel at the photo studio as his baby photo is on their website! Check out baby Leo as Yoda! Being a jedi is so tiring! He's going to love that photo when he's older! ;)


The meadow
So my walnut stained project base looked kind of boring, so I created a little woodland scene using green moss ribbon (its moss on a roll about 4" wide.) Then I glued on little green flowers and some plastic miniature deer. They are very tiny deer!


Drop-Caps are Cool
I put a storybook title on the side of my book-like project that says "A Basket of Goodies for Grandma". I love drop-caps in old storybooks! I especially love the letterpress fonts by Jessica Hische! Here is a link to her drop-cap-daily page with many drop-caps! She allows you to use them if they are for personal use! She is so talented!

My own fairy tale
I decided the Red Riding Hood story is a little creepy, so I created my own version of the story. In my story, Grandma tames the baby wolf, and outwits the big bad wolf. Then they all live happily ever after, playing with grandma, and eating goodies! The end!

Method Acting
Tessie was so adorable as Red Riding Hood and took her job of getting the goodies safely to grandma very seriously! She never smiled once but knew her mission, goodies to grandmas house. She has quite an imagination and was in character for the whole photo shoot. She was no longer Tessie, but was Red Riding Hood. This is funny as her mommy is a drama teacher! Tessie, the budding little method actress!

The deer are very happy on this side of the project and are jumping around! The tree branch is the Tim Holtz old tree die. I just cut it up a little and called it a branch. Love the crackle on the the branch, but you can't see it very well in the photo.

It was fun to make a storybook project, and to make up my own version of the fairy tale. I created a quick youtube video of the project and story for Tessie so she can watch it on the ipad. The toddlers would dismantle this project in about 3 minutes, so they can watch it on youtube instead!

I have enjoyed the Compendium of Curiosity iii challenges! Sometimes they are very challenging and other times the projects just happen! It's been fun for me to just "go with whatever" and see what happens! I've learned a lot and have created a lot of fun projects that I wouldn't have created otherwise! I love to look at what others have created and am so inspired by you! You ROCK!

Thanks for sharing my little fairy tale with me!


Tuesday, November 4, 2014

Compendium of Curiosities iii, Challenge 14 - Steampunk Christmas Hot Air Balloon

It's challenge #14 over at the Compendium of Curiosities III Challenge on the Studio L3 blog by Linda Ledbetter and the fabulous Curiosity Crew!!!  I have participated in every challenge so far and it's been a blast! For Challenge 14 we are creating a project using the Tim Holtz Colored Crackle technique found on page 53 of Compendium of Curiosities 3 by Tim Holtz. Challenge 14 is sponsored by The Funkie Junkie Boutique, with additional prizes donated by Tim Holtz and Mario Rossi!

Holy Steam-punk Crackle! I'm just saying that this project turned out to be a spectacular contraption. It was fun, inexpensive, and a joy to create! A lot simpler than it looks.


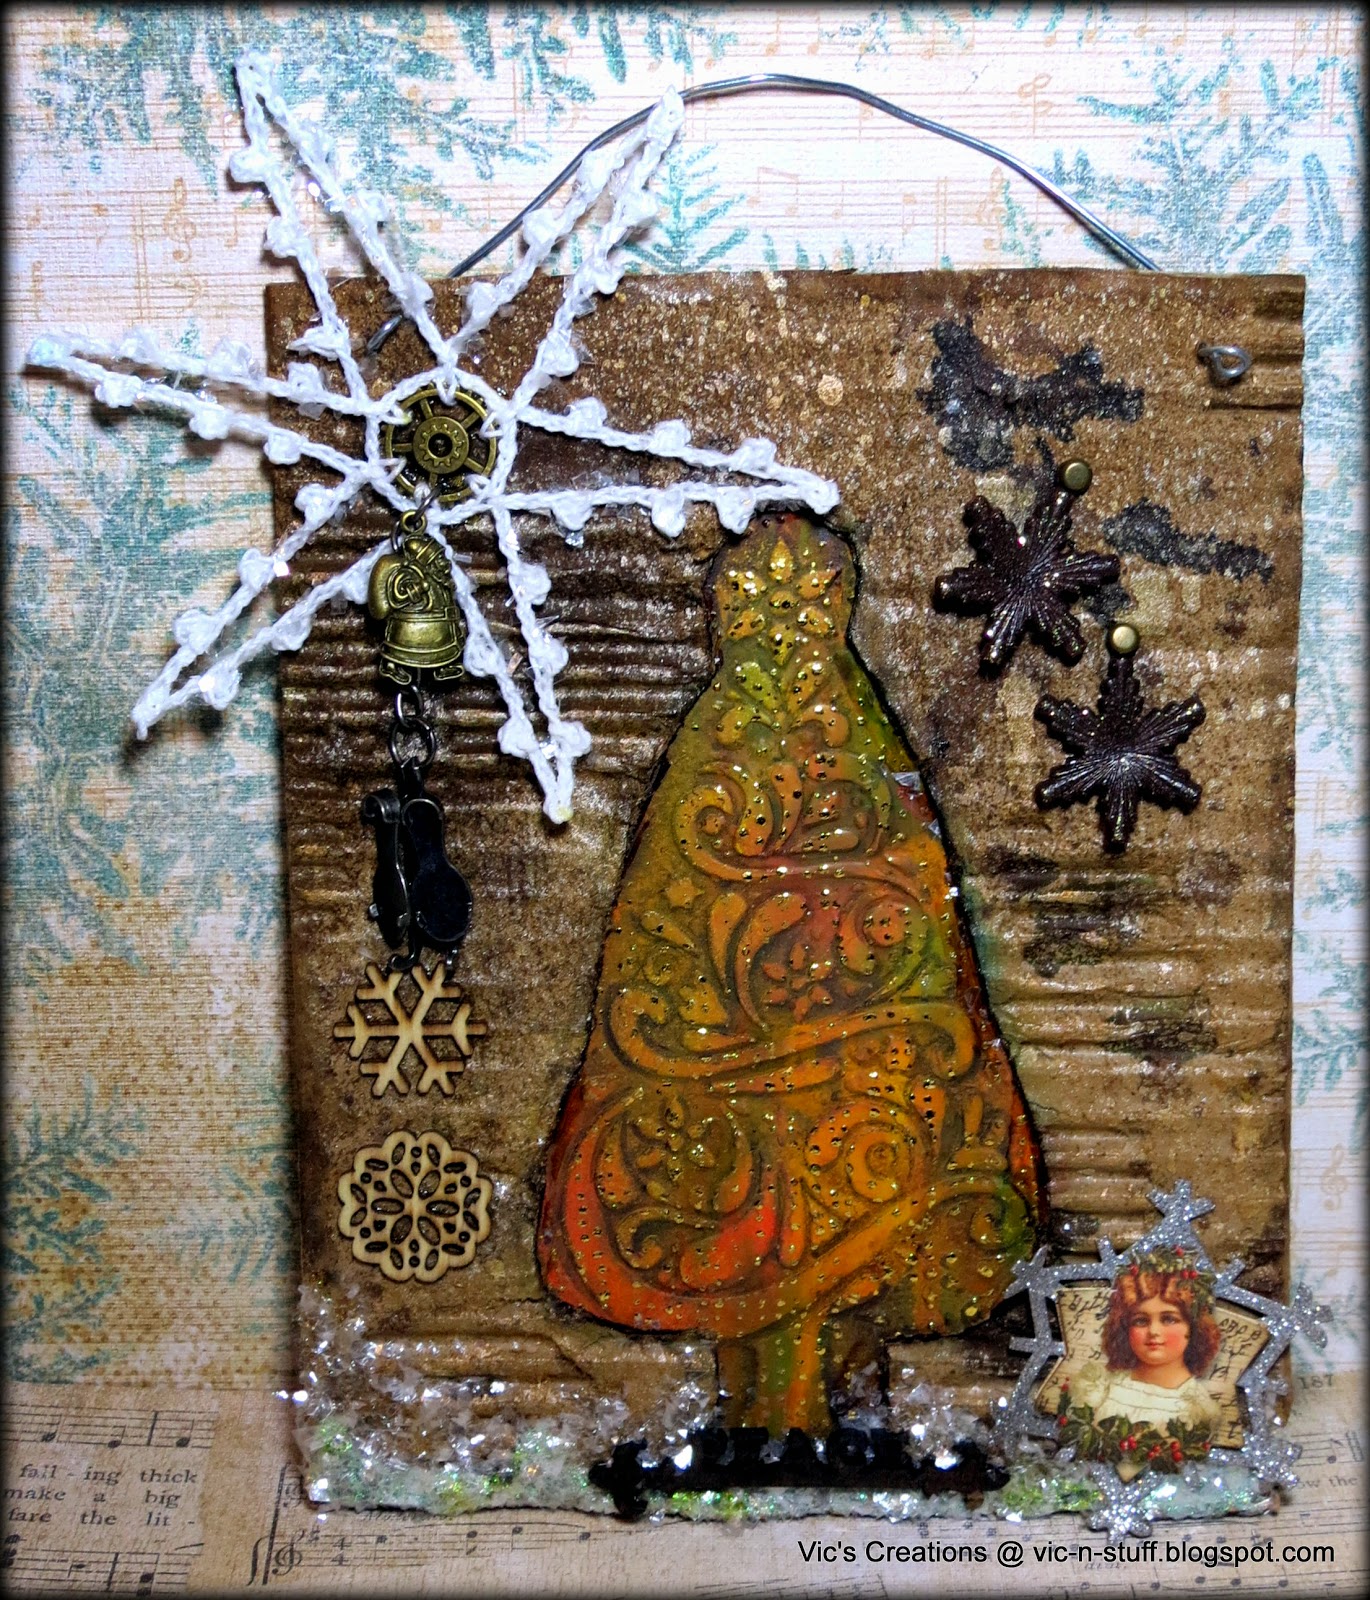
The Paper Mache Ornament speaks!
Have you ever had a project experience where the project practically makes itself? It was so easy and a joy to create. It all started when I saw a paper mache ornament blank at Hobby Lobby. I liked the shape of it while walking by the Christmas crafts display. No big deal. THEN all-of-a-sudden the blank ornament called out to me and spoke!!! "Vic, I am a steampunk Christmas hot-air balloon, please fulfill my destiny"!!! So who am I to argue with an inanimate object that only cost $2.00? "Oh, and Vic, I must also have a vintage Santa in my basket, and crochet snowflake propellers." So I was like, OK inanimate object, I have the skills, I think...so I purchased the paper mache ornament!!! So this project is not just a Compendium of Curiosity iii Project, but is the mystical fulfillment of the steam punk wish of a paper mache blank ornament who wanted to become a fantastical steam-punk Christmas flying contraption!!!


Mini gears
For the balloon gears I used the Memory Box gearworks border die and an inexpensive piece of craft foam. I glued the foam gears to the balloon section randomly. I'm just saying, I wish there was a Tim Holtz mini-gear strip die that I could have used that would produce tons of various small sizes of gears that we could cut out of craft foam for limitless and inexpensive steam punk projects. (Hint-Hint). I'm just saying...wouldn't that be a cool die to have.
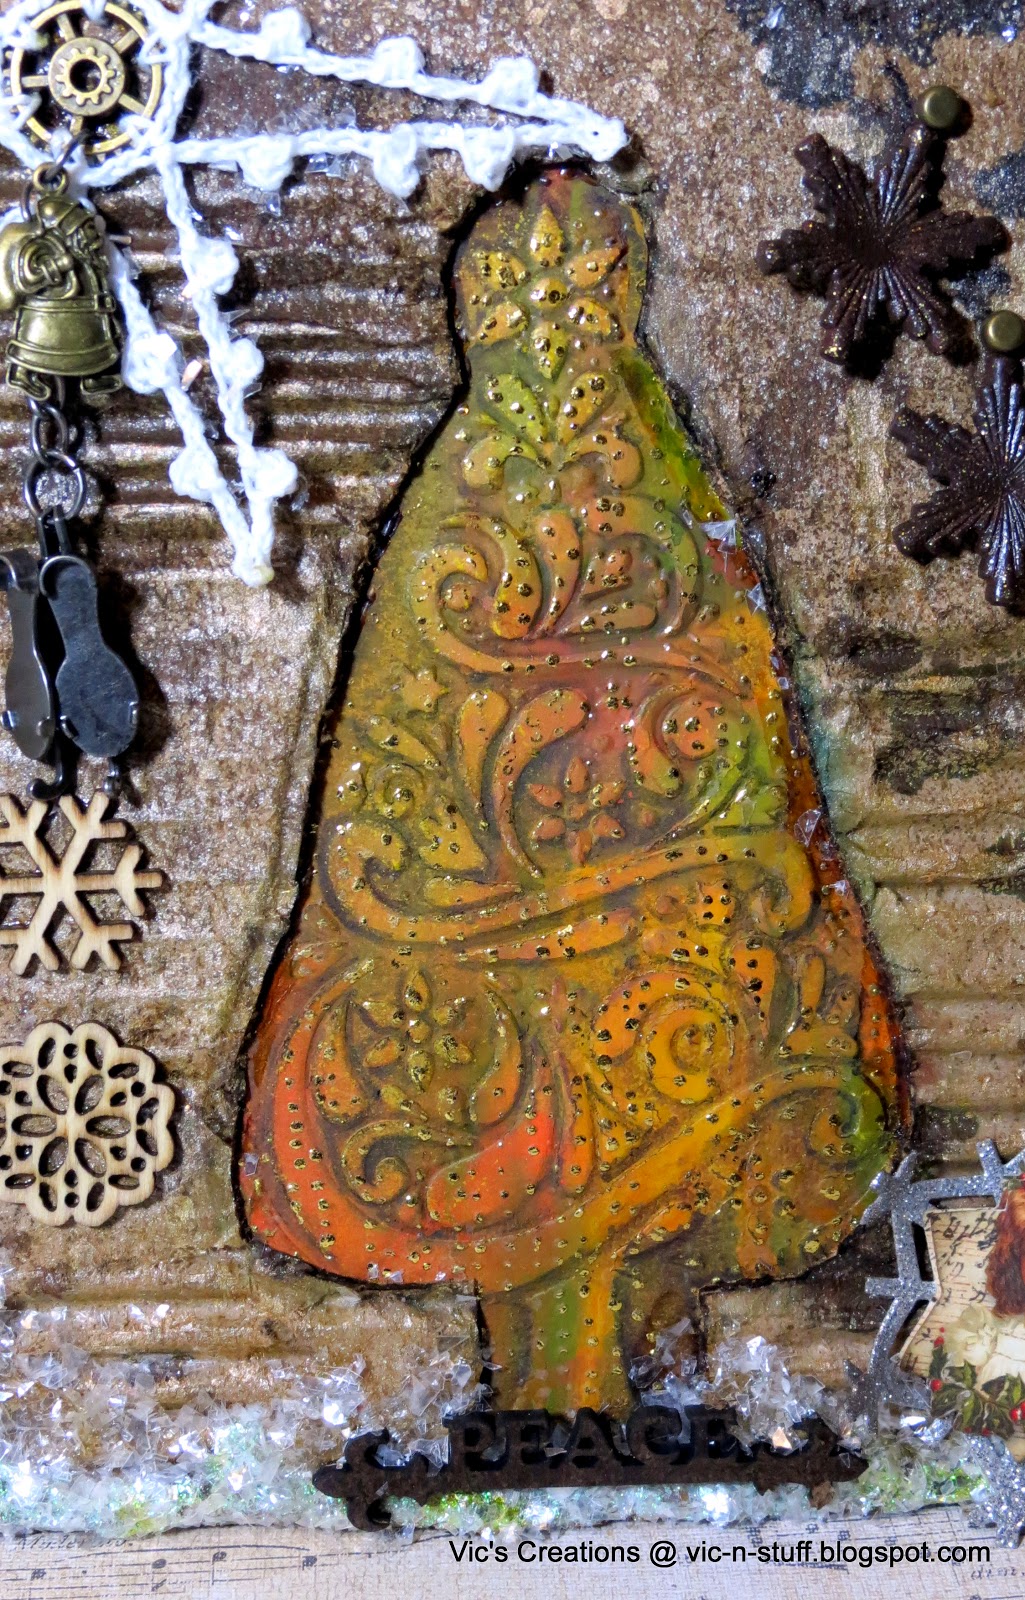
The Balloon
I painted the balloon with distress paint using a mixture of aged mahogany and festive berries. I also used tarnished brass, and brushed pewter. You can see the painted crackle technique on the metal-looking parts of the balloon, but you have to have Tim's book to find out how to do the technique.

I antiqued over the gears with a dark brown antiquing medium, distress paint would have worked, but I don't have any dark brown. I glued on some scrapbook paper and embellishments I already had in my stash of Christmas embellishment goodies. The rivets are just punched out of craft foam with a regular size hole punch, and a 1/8" hole punch, then glued on. So easy! Those are Tim Holtz Idea-ology memo pins that I pushed into the paper mache with a little glossy accents to hold the chains. The balloon chains are Tim Holtz Idea-ology swivel clasps.


The Propeller
I made the propeller out of cereal-box-like cardboard and I just drew the propeller freehand, cut it out, and glued it to a cardboard ring made from the same cardboard. The rivets are craft foam punched with a 1/8 hole punch. I just glued on the dots with glossy accents. Then I painted the propeller with distress paint, red, then pewter. I also used the crackle technique. I kept touching the propeller before it was dry, oops, which ended up making the propeller ring look like corroded metal. Excellent goof up!


The basket
I don't know what the basket was originally. I think it was the cardboard center of a roll of Christmas ribbon for presents. I had been using it as an egg-holder to dry some paper mache eggs I painted last spring. Now it's the hot air balloon basket. I glued on more gears and painted the same as the balloon. I punched some holes to wire up the Rudolph cutout and the back propeller.
The rudolph is a masonite cutout from Retro Art Cafe that I purchased last year. They have very cool stuff that you won't be able to resist, just a warning if you visit their website! Last Christmas I planned to make lots of projects, but instead ended up helping out with a new grand-baby. Fair trade!

The Vintage Santa is a Christmas comic book cover image. Santa was a little too bright, so I toned him down with watered down distress paint and distress ink.

The propeller is a steam punk crocheted snowflake I made stacked on a pin, along with a metal propeller. I poked the pin into a skewer stick (baking isle at grocery store). The stick split so I repaired it with tissue tape and painted it. There is a tiny cork to separate the propellers. They both spin which I am proud of.


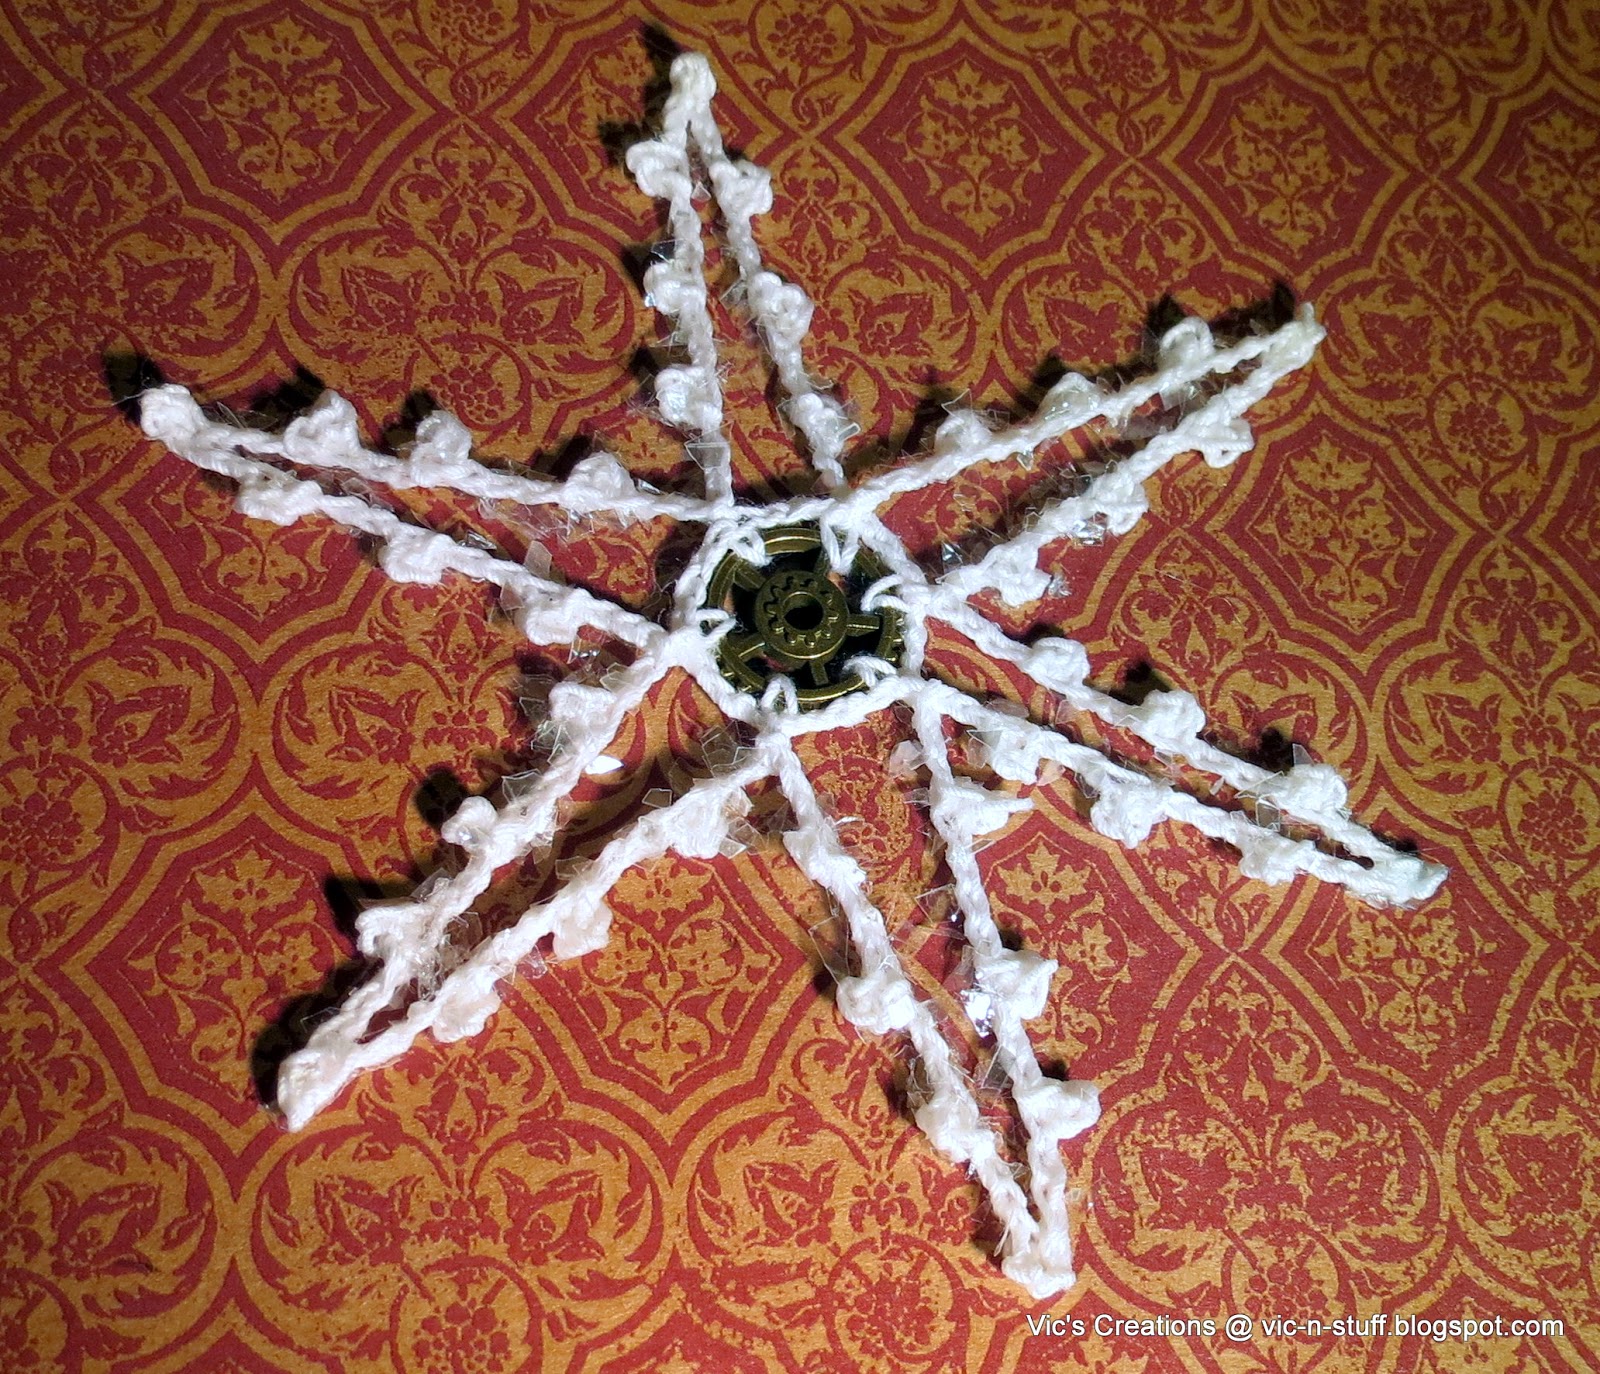
Steampunk crochet snowflakes
I learned how to crochet as a child, so crochet is easy for me. This project called for a steam punk crochet snowflake propeller so I invented one. I actually crocheted onto a Tim Holtz Idea-ology gear. I will give instructions in case you already know how to crochet and are interested. If you do not know how to crochet and must have a steampunk snowflake, I will create a youtube tutorial but I might have to post it later as it's not finished. I'll add the link to this post when I finish it.
Here's a snowflake I made that I didn't use.


Here's the basic idea until I finish the patterns.
First you get a Tim Holtz gear of the size that you want for the center of your snowflake.
Then you crochet the snowflake onto the gear with #10 crochet cotton string and a No 7/1.65mm steel crochet hook. The snowflake will be all floppy and won't look that good. Now you get about a 12 x 12 piece of cardboard and cover it with plastic wrap. Have some non-rusting pins handy. I've used T-pins before, and regular sewing pins, but you will get glue on them so don't use any pins you care about. Then you coat the snowflake with decoupage glue, or craft glue with a little water. I painted mine on with a paintbrush. Now pin the snowflake down to the plastic wrap covered cardboard into the shape you want. Once it's all pinned into place and wet with glue, you can sprinkle mica glitter onto the snowflake. Let the snowflake dry overnight. In the morning you can remove the pins and you will have a perfectly stiff snowflake with a gear in the center


I had so much fun making this Steampunk Christmas contraption and I think you will too. Give it a shot. If anyone is interested in making one, let me know, and I will give more instructions. It was one of those projects that spoke to me and makes me feel all Christmas inside!


I'm working on making some patterns for the steampunk snowflakes if anyone is interested let me know. It's hard to explain but if anyone is interested I'll make a pattern and youtube video tutorial later. I'm waiting on a tripod I'm borrowing so I can film it.

Pattern for large snowflake top of balloon propeller: To be continued...only if anyone is interested.

Pattern for medium snowflake top of balloon propeller: To be continued...only if anyone is interested.

Pattern for small snowflake basket propeller: To be continued...only if anyone is interested.


Thanks for checking out my invention!
My Steampunk Christmas balloon will be Merrily hanging from my kitchen light fixture floating above my kitchen table until Christmas!


Related Posts Plugin for WordPress, Blogger...