Tuesday, October 21, 2014

Compendium of Curiosities iii, Challenge 13 - Spooky Spell Book

I am participating in the Compendium of Curiosities iii Challenge on the Studio L3 blog by Linda Ledbetter. For Challenge 13 we are creating something using the Tim Holtz worn cover as found on page 35 of Compendium of Curiosities 3 by Tim Holtz.

Challenge 13 is sponsored by Inspiration Emporium, with more prizes courtesy of Mario Rossi and Tim Holtz!

I have been so impressed with the Curiosity crew's worn cover creations and the other CC3C participants' beautiful creations that I was at a loss as to what to create. I'd had an old worn cover still in the package and I wasn't sure what to do with it because I didn't want to ruin it as the worn covers are already pretty cute as is. I had no ideas. Nothing. So I decided to just create something and give up on trying to create something cool like all the wonderful projects I had seen.

(hang head in creative sorrow here...envisioning my dumb project on display...a worn cover with a sticker on it...oh the creative shame!)

So a few chocolates later, I was back in gear and I threw caution to the wind and just went nuts with my collection of Halloween trinkets.
The more I became lost in the process, the more I was enjoying my worn cover project. So I learned something from this project. Do what you love, and that love comes out in the project!!! I love October, the color orange in October, spooky images from vintage die cuts, owls, and charm bracelets.


So I'm happy with my project now and I'll have to say this dreaded project has been one of my favorites of all time!!! It was so fun to create using stuff from my stash of saved goodies!


Background
For the background I used the Tim Holtz gothic stencil and texture paste, lots of distress ink, then I sealed it with decoupage glue so if the cover accidentally gets a little wet, ink won't run all over the place. It turned out looking like leather, but at first I wasn't so sure about it. I ended up covering most of it up anyway but you can still see it a little.


Vintage Die Cut Images
I love vintage spooky die-cut Halloween party decorations from the 1919-1935ish time period. I have quite a collection of these as digital images on my computer. I decided to use a few of my favorites, the owl, and the witch. I had an orange frame from the craft store. I antiqued it with black soot distress paint. Distress paint is my favorite antiquing medium as it dries slowly, is easy to thin down with water, and is easy to wipe off leaving lots of paint in the crevices. I put the paint directly onto the frame and brushed it all over the frame before I rubbed it off. I love how the frame turned out! I printed the image to fit, sealed it with decoupage glue, and put a uv-curing coating over the picture just for fun.


The Rusty Lace Owl
I found a lace owl at Hobby Lobby that I painted with Modern Master's Iron paint, then I rusted it with the rust solution. I could have just painted it with rust colored paint, but I like to experiment with rusting things. It's as exciting as watching paint dry, but I like to walk by and check the progress every half hour or so...like a science project...I like to see what happens. I used stickles (purple and green glitter glue) on the eyes.


Canvas for Ink-Jet Printers
For the back I printed some images on Ink-Jet Canvas that is made for ink-jet printers. It's pretty cool as the canvas is coated with a gesso-like coating so the ink holds up. I cut out the images, distressed them with a sanding block, and used distress ink on them too. Then I just glued them on the cover.
The black lace doily was from a $2.00 bin at Michaels. I cut some off and glued it on.
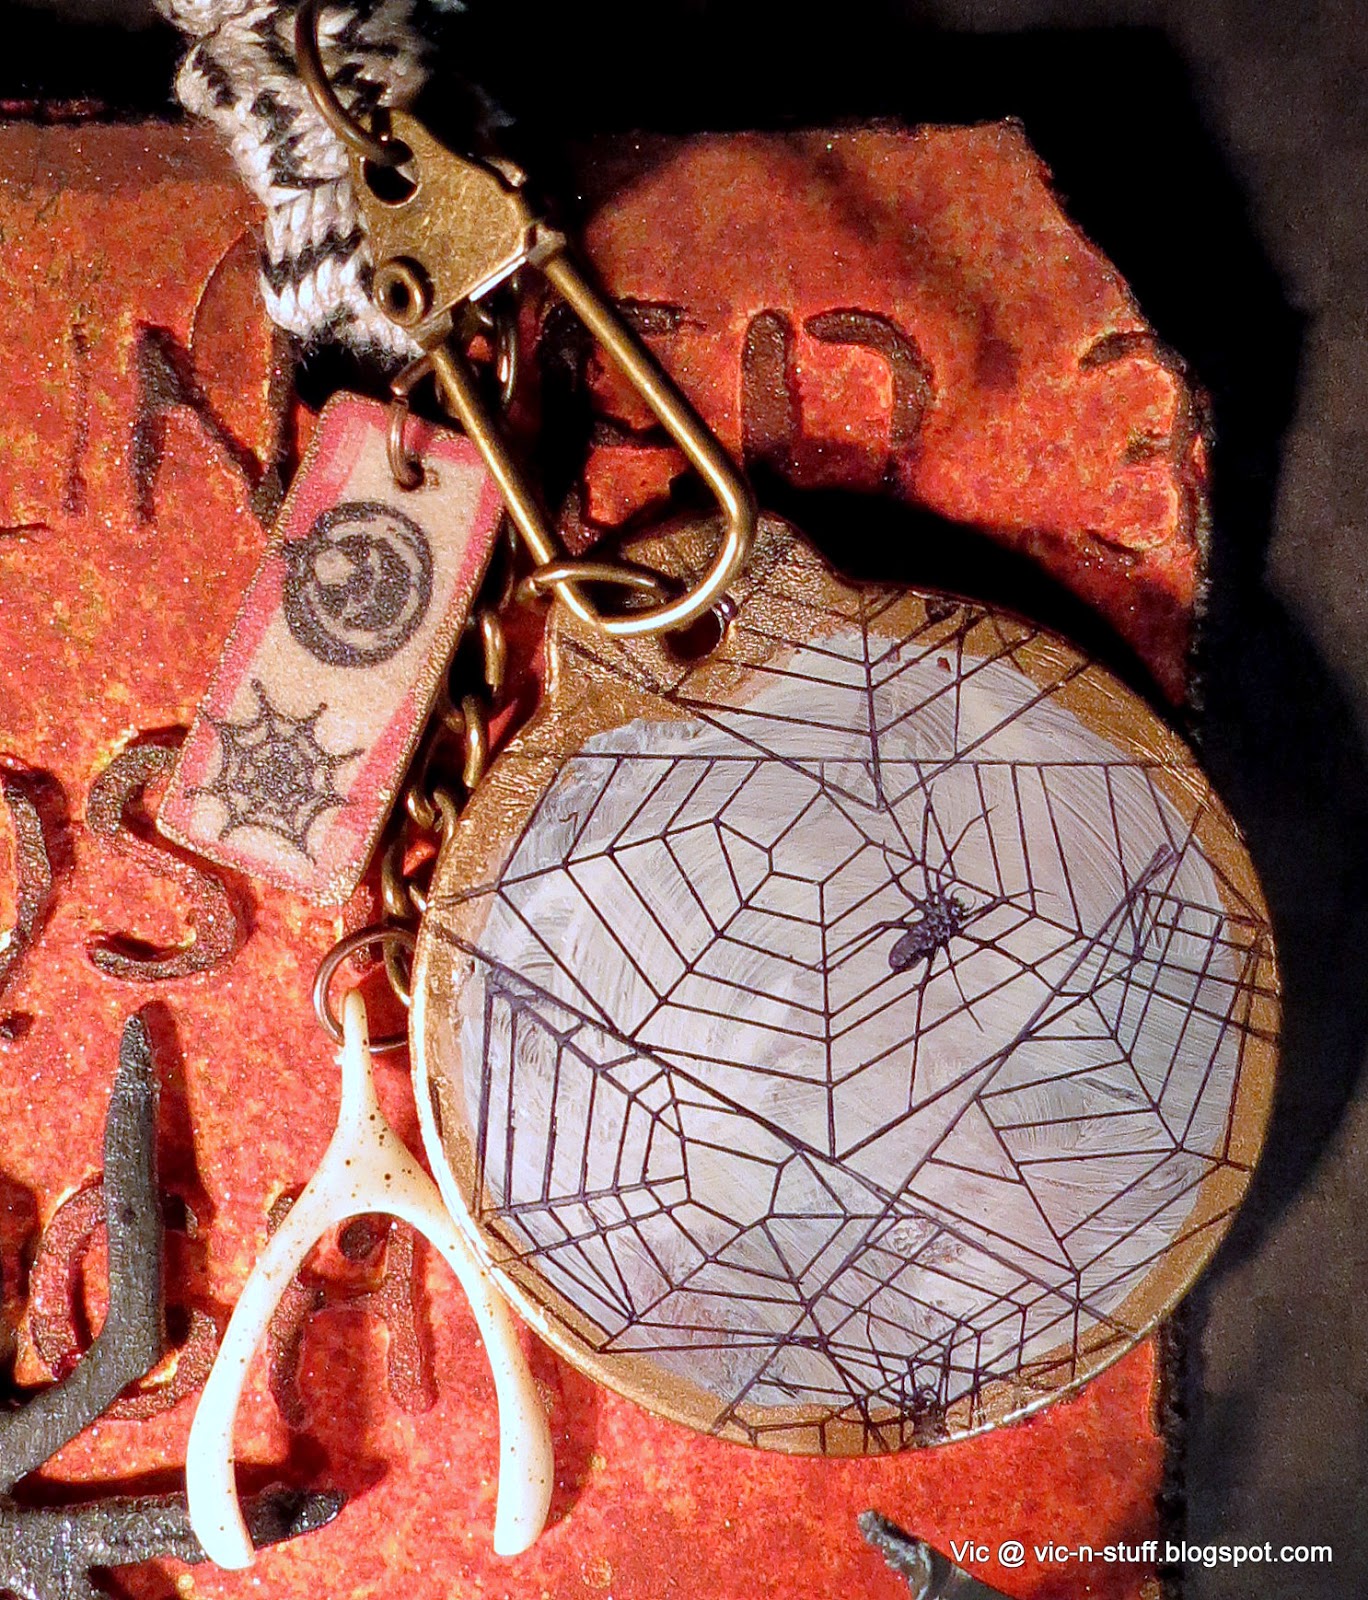


The charms
I created some jewelry charms, and some shrink plastic charms with the wood-cut looking Tim Holtz stamp set. I like the skull bead with the fringe charm I created.


I had so much fun creating this worn cover, I don't know why it was so hard to get started. I plan on using the book to store my favorite "October" things, vintage images, photos of grandchildren at the pumpkin patch, spooky embellishments I make.


Hey, I have an idea, I'll write down creative project ideas and keep them in the book for next Fall!

So thanks to Linda and all the curiosity crew for challenging me to create! Thanks to Tim Holtz for the cool products with that vintage look that we love and the compendium of curiosities! Sometimes it's hard to make time for creating, but it makes me so happy when I do! I can't wait to make more of these little books! I love the worn covers!

Friday, October 17, 2014

My October 2014 Tag - Halloween pumpkin Boo!

http://timholtz.com/12-tags-of-2014-october/

I've been playing along with the Tim Holtz 12 tags of 2014! Here is my take on Tim's October 2014 Tag. Ok, I love his October tag so I made mine almost the same! I substituted some stuff where I didn't have the same supplies.

I made a happy mess with some spray stains on the tag and texture paste spooky words. I don't have any Tim Holtz spray stains yet, but I did have a few Dylusions Ink Sprays from Ranger so I used those! You can't tell from the photo but I used 4 colors. In real life you can see the slightly different colors of spray ink. I didn't have any metallic ink spray so I used the Tim Holtz metallic stain and put it in a spray bottle. The spray bottle wouldn't cooperate and it kind of just dribbled all over the place. It's hard to tell how much texture the tag has in the photograph. Also the shimmer spray I used is messing with the lighting too.

I didn't have a monocle, but I did have a Tim Holtz clear fragment, so I painted on a gold frame to make it look like the monocle. I used the Tim Holtz rub-ons and stamped a spider web on the back so it would show through.

Here's the back of my home-made monocle! I was kind of proud that I was able to drill my wishbone with my inexpensive brand dremel-like tool from harbor freight without harming anything in the process! The soft plastic wishbones are pretty easy to drill.


I had the spider stamp Tim used, but it was too late as I'd already put the texture paste on the tag. oops! So I used the die-cut spider instead.

I cut the bats using the movers and shapers bat die and a pepsi can. I used a texture fade to emboss the cutout, and used black soot distress paint to make the bat look scary and not like a pop can.


To make the ribbon trim look more scary I threaded a thin black wire through the middle of the ribbon and then scrunched it up so it looks a little wacky. Then I bent the wire to the back to hold it in place. It kind of gathered the trim. I also used a little shrink plastic charm that was a left-over from another project.


I started running out of room, so I decided to use a little "boo" under the pumpkin.
I love Halloween projects and I enjoyed making this tag! The spray stains are easy to use and I look forward to getting some Tim Holtz spray inks soon. I love the wood-cut looking Tim Holtz stamp set!!! The stamp images from the set are very mischievous! I like the mischievous and busy Halloween grungy look!

Happy Halloween!

Monday, October 13, 2014

Halloween Crow Wreath - Thanks Shelly Hickox!

I love the Stamptramp blog by Shelly Hickox!!!

She made an adorable Halloween Wreath that she originally saw in Williams-Sonoma. I followed her simple instructions and made one and was excited to hang it on my front door.

But then....I saw a bigger grapevine wreath on sale...and there were some black and white Christmas ornaments on sale at Hobby Lobby, and I came up with a bigger version for my front door!


I followed the same instructions on the Stamptramp blog by Shelly Hickox. Then I got some dollar store skeletons. The crow was also from Dollar Tree. They had some black skeletons and bone colored skeletons that are part of a skeleton garland so there are 4 skeletons on each package. I had 2 Christmas floral picks with berries and painted them black. They cost $1.60 but were 50% off at Hobby Lobby. I got 2 picture frame ornaments that were also on sale at Hobby Lobby for 40% off. The owl and the black scroll dangle are also Christmas tree ornaments from the sale.

For the first picture frame I printed a witch image I purchased last year from alphastamps. I added Tim Holtz Halloween rub-ons in the background, added a little watercolor (very watered down) to make the photo look a aged and popped the witch in the frame. I sealed around the edge of the plastic frame to protect the photo from the weather. The bat is a tim holtz bat movers and shapers die that I cut from a pop can. I used a texture folder and some paint to make the bat more scary.


This frame is also a Christmas ornament frame from the Hobby Lobby sale. I printed the photo, and put a "Witch Hazel" rub-on from Tim Holtz over the photo. (The rub-ons come with a black sheet, and a white sheet of rub-ons.)  I sealed the entire photo with a jewelry coating because I broke the glass. oops. I glued on another pop-can bat on the corner.

So that was it. A wreath, some black spray paint, a few ornaments, and some dollar store items and I have a spooky Halloween Wreath that looks like a fancy designer wreath for the door of a Mansion.

I will probably add to it as time goes on. I will look through my old collection of ornaments to see what I can find. Thanks Shelly for the great ideas!

My original small wreath is undergoing a makeover right now as it fell off the door and lost it's crow and is being repaired. It will go on my back door. It's much smaller, but still very cute!


Tuesday, October 7, 2014

CC3C Challenge - Photo Tinting, Mud and Simple Gifts

Compendium of Curiosities III Challenge 12 - Photo Tinting!
I have been participating in the Compendium of Curiosities III Challenge on the Studio L3 blog by Linda Ledbetter with so much inspiration from the fabulous Curiosity Crew!!!  For Challenge 12 we are creating a project using the Tim Holtz Photo Tinting technique found on page 41 of Compendium of Curiosities 3 by Tim Holtz. Challenge 12 is sponsored by The Funkie Junkie Boutique, with additional prizes donated by Mario Rossi and Tim Holtz!

Photo from a slide
Last year for Christmas my mom gave our family a thumb drive containing hundreds of photos scanned from her old collection of slides she had taken over the years! The gift was a labor of love. As I was looking through the images I was laughing about one particular photo of me. It's one of those photos that really captures a moment that reveals the true self...the real me.


When I was young, our family went on vacation to Lake Powell in Utah/Arizona with my uncle's family as they had a boat. We met them there for a family camping/ boating trip.
In the photo I had sunburned legs, so I was enjoying some cool mud on my legs next to the lake but then I realized that I could also make a creation with mud on my legs and became engrossed in my cool mud creation. I remember at the time thinking that I didn't want to get up because I didn't want to disturb my goblin valley, or stalagmite formation on my lap, so I just sat there for awhile with it on my lap. It makes me laugh now because the photo is very me!

So here are the project details.

Photo Tinting
I followed the photo tinting technique found on page 41 of Compendium of Curiosities 3 by Tim Holtz. It worked very well! I put it inside a Tim Holtz cabinet card. I used distress powder to rust the viewmaster reel. It's a smaller sized reel die from Sizzix by Echo Park.

Aida Haron - Tim Holtz Media Team
Background Inspiration
For my background I was inspired by the mixed media canvas by Aida Haron who is part of the Tim Holtz Media Team. I liked her techniques and the way she organized the canvas. Check out her post on the Tim Holtz blog for a great tutorial.
I also painted over torn bits of scrapbook paper, added die cut leaves and painted over them, I used paint, die, many stencils, stamps, die cut objects, watercolor with distress inks, spattered with the spritzer tool, etc. I used the Tim Holtz stamp "worn text" to stamp "create" and the numbers, and various other stamps I had. I used an old sizzix leaves die on the background called flowers, branches and leaves. The Tim Holtz "Spring Greenery" strip die would have looked cool too. The dot stencil is from Tim Holtz. Some of my other stencils are very old from the earliest scrapbooking days.


Crackle Butterflies 
My butterflies are plaster in a chocolate mold, again. I've been having fun playing with plaster in the chocolate molds lately. Some kind of nostalgia thing again from my youth. Here's the mold I used. It's fun because the chocolate molds usually only cost $2.00 so it's not a big expense to give them a try. I've been mixing up permastone with water in a plastic cup that I pour into the molds. It's not expensive either and it dries pretty quick. It never sticks to the molds!


Tim's Sand
I was so happy about the sand oozing out of my tinted photo. The sand was created using the technique used by Tim Holtz for his 12-tags of July tutorial. I just used different colors to match the red dirt of Lake Powell. I used the Tim Holtz strip die "Chip Block" alphabet for my project title, which I covered with the faux "sand". I used "Ransom" alpha-parts to spell Vic, using another technique found in Compendium of Curiosities III.


The Fish
The fish are 3 beads on some layers of foam dots. The fish were in my collection of treasures for some unknown reason. I purchased them a long time ago from an Etsy shop called The Sample Room. Lucky for you, you can still purchase these fish for $3.00 here. The fish are swimming through a Martha Stewart Stencil called Cathedral Lace.

Thanks for letting me share my "Simple Gifts" project with you. I hope you will stop and appreciate the "Simple Gifts" in your lives and appreciate all the little things that make you who you are!!!


More about Mud

This was not my first experience with mud creations. When my friend and I were about 11 years old we became intrigued by a large hole we found in the field near our house. The hole was about a foot wide and about 2 feet deep. We immediately got a hose and filled it with water making a mud slurry by stirring it with a stick. Then we sat down and dangled our legs into the mud until it was up to our knees making mud knee socks. We were so pleased by this that we got out and let the mud dry on our legs and walked around the neighborhood sporting our mud knee sock fashion statement. Knee socks were in style at the time. Then we realized the mud must have contained clay so as to stick so well to our legs. We ran back and gathered some mud clay from the side of the hole until we had collected enough to make 2 clay pots. We were very proud of our work and felt like ancient Pueblo Indians as we had been studying their history at school. I painted my clay pot with the appropriate designs from the ancient Pueblo period, then made a beaded bracelet on a loom to go with my theme. I might be tempted to do the same today.

The Simple Gifts Song
It was fun to reminisce making this project in celebration of the simple things in life like finding joy in a mud creation or celebrating the colors and textures found in nature or the feeling of summer sun, wind and water. These simple things that I love are the simple gifts in life. My son and I used to go to his guitar lessons where he played in a kid guitar ensemble and they would practice the beautiful song "simple gifts". Even though they were young, when they played all together it sounded so beautiful. My daughter also played Simple Gifts with her orchestra as a child. The simple gift of going to a music lesson with a child, and now watching the child all grown up now teaching many children to play "simple gifts" as well as teaching them that they all have their own simple gifts to share.

The simple gift of teaching your grandchildren how to properly play with mud which your own children do not really appreciate you teaching them, BUT you do not care as you know that there is joy to be found in the simple and that learning to appreciate the simple things is a gift in and of itself.

The Piano Guys and Simple Gifts
Here are the piano guys playing a medley of "Over the Rainbow and Simple Gifts!"

Related Posts Plugin for WordPress, Blogger...