Sunday, November 17, 2013

Spooky Halloween Mini Hutch Altered Art Shrine

It's well into November so I'm a little late finishing my Halloween mini-hutch project but here it is. It's very spooky and loaded with treasures. The mini-hutch base is from Alphastamps. They had a mini-halloween hutch swap that looked interesting. I started my project after their swap was over, but I was inspired by all of their entries in their mini-hutch swap gallery. Their entries enticed me into working on that blank hutch I'd purchased several months ago. I'd already made some spooky treasures with no home yet.


The hutch kit pieces fit together with some tabs that you glue into place. The kit comes with the hutch, a bat, and 3 skull cutouts! I painted the hutch, then papered and glittered it! The dragon/monster is a jewelry charm. The tiny jars are filled with glitter. I used halloween tissue tape for the jar labels. The table is a small spool with wire. There is a bat flying on the wire.

Here's the back of the hutch. I filled it with just as much spooky stuff as the front. 

I made the candles out of polymer clay. I made the pumpkin following a tutorial from miniature artist Caroline Mcfarlane-Watts. The orange skull is a ceramic bead and I added the chain fringe. The candles are attached to a dollhouse platter, and the black chain is attached to the platter handles. The cauldron-looking flagpole holder is just a small wooden knob-like item found in the craft store near all the packages of small wooden shapes.

Here's the side of the mini-hutch. The little girl graphic is from a collage sheet from Alphastamps. 


Here's the other side of the mini-hutch.

This witch is from another collage sheet from Alphastamps. You can see the fringe on the orange ceramic skull bead from this angle.


I made a flag for the top out of a wooden skewer painted black. The flag is some tissue tape. I topped it off with a green bead and owl bead on a headpin that I cut off and glued on the top.

Here's a close up of the scary items.


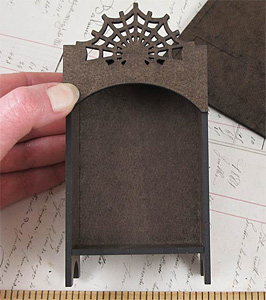
The paper trim is from the Tim Holtz die called Ironwork Gate. After I die-cut it from cardstock I just snipped off pieces that I needed, painted them black, and glued them on. The die makes great trim.

I really enjoyed making the hutch so my next project will probably be a Christmas hutch of some kind. The finished size is only 2 3/4" X 5 3/4", so it's not very big. I enjoyed making this project because it wasn't overwhelming as it was small and gave me somewhere to display all the tiny treasures I had created.

http://www.alphastamps.com/p14331/ATC_Hutch_Kit_-_Halloween/product_info.html
So Happy Belated Halloween from my spooky cupboard! Make one, its lots of fun!

Thursday, November 7, 2013

November 2013 Tag based on Tim Holtz tags of 2013

http://timholtz.com/wp-content/uploads/2013/11/novembertag.jpg

Here is my tag based on the November Tim Holtz 12-tags-of-2013 tutorial. I was excited to play with chalk because I'd never tried that technique yet from the Chemistry 102 course. So I got out the old school chalk and was ready to try some fingerpainting!

It turned out pretty cool and wasn't hard. I was expecting it to be hard because everyone said it would take lots of trial and error, but the tutorial worked great for me. Here's what I did. I had some cool vintage-looking manila folders from Hobby Lobby, the package said Fiddlestix Paperie. I used the Tim Holz Mover's and Shapers Tag and Bookplates Die to cut out some tags. Now I have some really cool bookplates to go on another project too!


Then I got out some Americana chalkboard paint, and used my fingers to paint an area on the tags. Pretty messy but enjoyable. I painted on two coats. Then I let it dry overnight. Hey, see my cool glass owl place-mat for my spot at the kitchen table so I won't keep ruining my table/tablecloth with my painting projects. I have other places I could paint, but I always seem to like to paint at the kitchen table where more stuff is happening.


Then I stamped using Ranger Distress embossing ink, and poured on the ranger antiquities Frosted embossing powder. I heated it up carefully because I was afraid the chalkboard paint might bubble or melt, but it didn't. I didn't hold the heat gun too close and waited until the embossing powder just barely melted.


Then I got the side of the square chalk and just drew on the embossed image and it worked great! The tutorial worked like a charm. This was my first time trying out the antiquities embossing powder. I'd never heard of it before.

So my tag turned out pretty cool! No blunders this time. I'm hoping to finish up the other two and see if they turn out as well. I think it helped that I was using white cheap-o pastel chalk that is a little softer than school chalk.


Excellent tutorial! I'm learning so much from the 12-tags tutorials and all of the creative tutorials people post! Thanks!

This is the first time I used a stamp from my new stamp set from Chocolate Baroque. I'd ordered the stamp set forever ago, but my order got lost in the mail from England to the US. They were kind enough to send a replacement set. Whew! The set is called Fancy Flowers.

Here's the second tag I created with a Christmas theme. I used embossing enamel this time and didn't use chalk. It's kind of glopy and lumpy, but has a slight shimmer that you can't see in the photo. Very vintage looking.


Even though I'm displaying a Christmas tag, Have a Happy Thanksgiving!

Hey, I found out some of my ancestors came over on the Mayflower, so I will be celebrating it with reverence this year in gratitude for all those who made it possible for me to be here!

Related Posts Plugin for WordPress, Blogger...