Here are my 3 vintage flowers based on the Tim Holtz Tattered Floral Challenge tutorial.
I couldn't find my grungeboard, I probably used it all, so I improvised with some metallic paper that is pretty stiff, but flexible. Then I glued on some tissue paper with a key pattern. Then I covered that with a messy mixture of paint and water, let it dry, then covered the whole page with decoupage glue to make it a little stiffer.
After that dried, I painted the other side of the paper and sprayed both sides with perfect pearls mist.
So after I finished my paper, tissue paper, paint, glue sandwiches in blue, pink, yellow, and green I ran them through the vagabond machine with the tattered floral die. I used the green with the leaf die.
I pretty much followed the tutorial after that. I inked all the edges with distress inks to give them dimension and tone down the colors a little to make them look vintage. I cut some more tattered floral petals using some canvas fabric, and some muslin I tea-dyed for a different project a long time ago.
I wanted the flowers to look vintage and at home with antiques. I think they do.
I'll have to try it again when I have time to get some real grungeboard.
It's been cold and snowy out so as I made a mess making these vintage flowers I was dreaming of spring when I can plant some real flowers!!!
Thanks for the fun tutorial!!! I've tried to make flowers with the tattered floral die before, but with me just working on my own they always turned out kind of flat and stupid. This time by following the tutorial they turned out great! Sweet Victory!
Sunday, February 24, 2013
Saturday, February 9, 2013
Love and Skeletons - February tag based on Tim Holtz 12 Tags of 2013
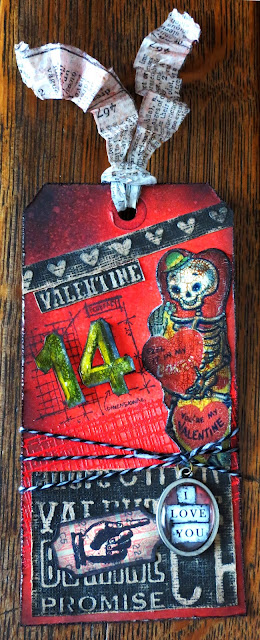
Here is my February Tag based on Tim Holtz 12 Tags of 2013 Tutorials.
I was going to use the queen of hearts but I only have the mini-queen-of-hearts size and it looked too small for the tag. I had an old vintage valentine that says "I Feel it in my bones, you're my valentine." Since my husband teaches anatomy and physiology, I think the skeleton valentine works. I used distress stain, distress ink, Tim holtz stamps, embossing powder, rock candy crackle on the skeleton valentine and numbers, distress markers, Tim Holtz seaonal impressions paper, tissue tape, and the vintage cash keys charms from tim holtz. I just printed my "I LOVE YOU" words on paper, cut them out, inked the edges and glued them on some red paper. I used foam tape to make the "14" dimensional.
I was going to use the queen of hearts but I only have the mini-queen-of-hearts size and it looked too small for the tag. I had an old vintage valentine that says "I Feel it in my bones, you're my valentine." Since my husband teaches anatomy and physiology, I think the skeleton valentine works. I used distress stain, distress ink, Tim holtz stamps, embossing powder, rock candy crackle on the skeleton valentine and numbers, distress markers, Tim Holtz seaonal impressions paper, tissue tape, and the vintage cash keys charms from tim holtz. I just printed my "I LOVE YOU" words on paper, cut them out, inked the edges and glued them on some red paper. I used foam tape to make the "14" dimensional.
Here's a link to the Skeleton Valentine. Here a link to My February 2013 Tag (large photo)
This tag has a lot of texture going on, you have to touch it.
Since my husband teaches anatomy, the skeleton is not scary to me. The skeleton is the foundation or the structure of our bodies. It allows us to move. The skeleton supports the mechanics of movement. It also protects our vital organs. To me the skeleton doesn't represent death, but represents the structure and movement of life. With it's ever smiling teeth, the skeleton to me represents the joy that we should feel in life that we are able to move, that we have a solid foundation, and that we can run, jump, and leap! So here's to Love and Skeletons. We need both as a foundation, support, structure, and protector in life! So for those of you that become sad on valentines day, leap for joy that you have a happy skeleton inside that can move you in any direction you want! And then use your skeleton to run down and get yourself a favorite chocolate bar! And maybe one to share...with me!
Happy Valentines Day!!!
Friday, February 1, 2013
Valentines Day Wooden Hearts on a Stick
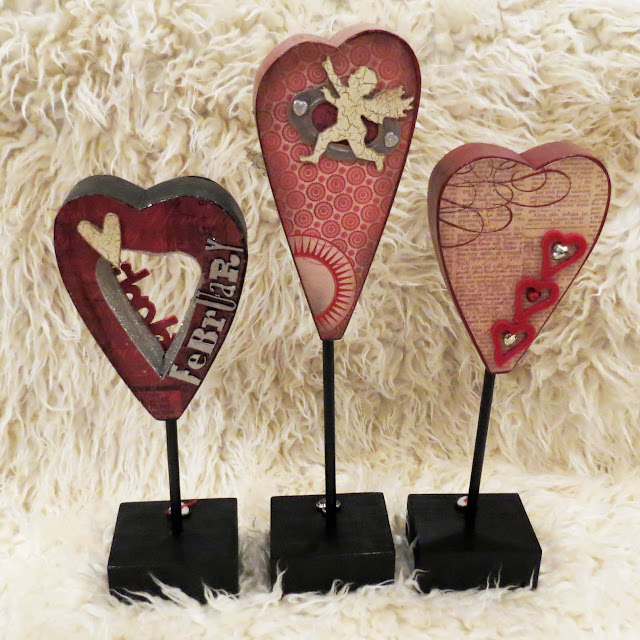
I painted and decoupaged some wooden hearts on sticks I got at Crafty Wood Cutouts. The tallest heart is about 14 inches tall and 3 1/2 inches wide.
The middle heart I embellished with the Sizzix Tim Holtz die on chipboard covered with scrapbook paper. The white crackle on the heart and wings is actually scrapbook paper that came with the crackle design. It looks like I painted the crackle finish but it's just the paper design. The crown is gold metallic paper on chipboard cut with the same Heart Wings die.
Then I decided to decorate the other side so the hearts are cute on both sides.
The letters are from the Tim Holtz letters . I painted them with metallic silver. The heart and cupid are die cut on chipboard covered with scrapbook paper. The cupid is sitting on another sizzix Tim Holtz die cut bookplate that I painted silver. I glued 2 silver heart button embellishments onto the bookplate. The heart on the right is embellished with 3 felt hearts with some gem hearts I glued on with glossy accents.
Most of the paper I used was from My Mind's Eye, Union Square, "Home Sweet Home" collection. I love the "Love" paper from My Mind's Eye. I love ALL of the paper from My Mind's Eye. The stripe paper is My Mind's Eye, and the dark red paper on the "February" heart is from DCWV.
I enjoyed making this Valentines decoration using wood, paint, and scrapbooking supplies.
Here are a few other valentine decorations I made using a Tim Holtz stamp card kit from Archivers. The kit included a 6X6 paper pad from My Mind's Eye (Ruby), and the Valentines mini-blue print stamps from Tim Holtz. Instead of making all the cards, I reserved a few and decoupaged them onto some pieces of wood. We made the rest of the cards for a family activity after a Sunday dinner for fun.
Happy Valentines Day!
I painted the bases with black acrylic paint. I painted the sides of the hearts with either black or maroon acrylic paint. Then I cut out some scrapbook paper and inked around the paper with the Ranger Distress Inks. Then I decoupaged the paper onto the hearts. Then I varnished the hearts with a few coats of varnish.
Then I put some fun embellishments on the hearts.
The "valentine" embellishment was from Hobby Lobby. It's a wood cutout covered with glitter. It came that way. I added some black outlining to the word to make it stand out. I also covered the inside of the heart with silver glitter and added some heart punches out of gray stripe scrapbook paper.
The middle heart I embellished with the Sizzix Tim Holtz die on chipboard covered with scrapbook paper. The white crackle on the heart and wings is actually scrapbook paper that came with the crackle design. It looks like I painted the crackle finish but it's just the paper design. The crown is gold metallic paper on chipboard cut with the same Heart Wings die.
Then I decided to decorate the other side so the hearts are cute on both sides.
The letters are from the Tim Holtz letters . I painted them with metallic silver. The heart and cupid are die cut on chipboard covered with scrapbook paper. The cupid is sitting on another sizzix Tim Holtz die cut bookplate that I painted silver. I glued 2 silver heart button embellishments onto the bookplate. The heart on the right is embellished with 3 felt hearts with some gem hearts I glued on with glossy accents.
Most of the paper I used was from My Mind's Eye, Union Square, "Home Sweet Home" collection. I love the "Love" paper from My Mind's Eye. I love ALL of the paper from My Mind's Eye. The stripe paper is My Mind's Eye, and the dark red paper on the "February" heart is from DCWV.
I enjoyed making this Valentines decoration using wood, paint, and scrapbooking supplies.
Here are a few other valentine decorations I made using a Tim Holtz stamp card kit from Archivers. The kit included a 6X6 paper pad from My Mind's Eye (Ruby), and the Valentines mini-blue print stamps from Tim Holtz. Instead of making all the cards, I reserved a few and decoupaged them onto some pieces of wood. We made the rest of the cards for a family activity after a Sunday dinner for fun.
Happy Valentines Day!
Subscribe to:
Posts (Atom)


